Home
Microsoft 365
Linux
Windows
Powershell
Cloud Computing
    Citrix Xendesktop
    Citrix XenApp
Useful links
About
  • Home
  • Microsoft 365
  • Linux
  • Windows
  • Powershell
  • Cloud Computing
    • Citrix Xendesktop
    • Citrix XenApp
  • Useful links
  • About
ajni.IT -
Hyper-V•Virtualization•VMware•Windows Server

Active Directory Certificate Services (AD CS) on Windows Server 2019

August 30, 2020 by AJNI No Comments

Active Directory Certificate Services is the Windows implementation of Public Key Encryption (PKI). ADCS is needed whenever you are hosting a web server that needs to encrypt data over the wire. Instead of buying a public certificate, you implement your own trusted internal Certificate Authority (CA), deploy the Root Certificate to your clients through GPO, and then you can create as many web server certificates as you want.

My deployment consists of two servers with Windows Server 2019. The first server will be the Offline Root Certificate Authority (offline because it will be offline for most of the time) and will not be part of the domain. The second server will be a domain member and will be the Issuing CA.

So on the first server, install the ADCS role on the Workgroup server in Server Manager:

Under Role Services, select Certification Authority.

After the role installation, proceed with the configuration.

This server will be the Standalone Root CA, the domain member will be an Enterprise Subordinate CA.

Create a new private key. SHA256 should be just fine for the hash algorithm with a key length of 2048.

Give the CA a name.

The offline Root CA should be valid for 10 years. The online CA for 5.

Here a recap of the settings we chose.

Before configuring the second server, let’s change the Authority Information Access (AIA) and the CRL Distribution Point (CDP). These must be reachable by clients at any time. Open the properties and head to extensions. Remove all the distribution points on the CDP and create these ones (I am not sure if IDP is needed, please let me know):

http://www.ajni.it/pki/<CaName>.crt

Change the validity period of the Subordinate CA certificate we are just going to issue and the CDP (5 years for the Subordinate CA and one year for the CDP):

HKEY_LOCAL_MACHINE\SYSTEM\CurrentControlSet\Services\CertSvc\Configuration\AJNI-Root-CA

Now let’s install and configure the second online CA server. The feature installation wizard is the same as on the first server. The configuration is slightly different.

Like previously mentioned, we are using an Enterprise Subordinate CA.

We are creating a new key. The hash algorithm is also SHA256 with a key size of 2048.

The certificate request will be uploaded to first server and digitally signed by the offline Root CA.

Here is once again the summary of all configured settings.

Now upload the certificate request file to the first CA. Open the Certification Authority MMC on the first server and submit a new request.

Under Pending Request you should see your request (it might take a few seconds). Here you can issue the certificate.

Save the signed certificate to a file as a DER format. Also, copy the Root certificate to the second server and install it in the local certificate store.

On the online CA, start the ADCS service and install the signed certificate from the offline CA.

Select the previously saved file.

You will probably get an error when attempting to start the service because the CDP is not reachable (http://www.ajni.it/pki/…). With pkiview.msc, you can check if the distribution point are reachable and up-to-date:

Now you will need a webserver where these files are going to be hosted. I will install IIS on the same server, but it is highly recommended to host it on a separate server.

Change IIS configuration to respond to requests with the DNS name www.ajni.it:

Create a DNS entry pointing to the server:

Create the CRL file on the offline Root CA and copy them to the IIS root folder (in my case it’s C:\inetpub\wwwroot\pki):

The file will be created under C:\cert. We’ll also need the Root CA file. The file name needs to be Ajni-Root-CA.crt though.

Here the file inside the IIS folder:

On pkiview.msc, everything should be green on the Ajni-Root-CA. When dealing with Delta CRL, IIS might block downloads because of double escaping. To solve that allow double escaping on IIS under Request Filtering:

Now that the CDP is reachable, the Subordinate CA can be started without any issues. Like on the Root CA, we have to change CDP and AIA locations:

file://C:\inetpub\wwwroot\pki\<CaName><CRLNameSuffix><DeltaCRLAllowed>.crl

http://www.ajni.it/pki/<CaName><CRLNameSuffix><DeltaCRLAllowed>.crl

With the above configuration, CRL and delta CRL will be automatically published to the IIS root folder.

Publish the first CRL manually (you need to revoke one certificate, otherwise, the list will not be created. Do that through certlm.msc). Afterward, everything should be green in pkiview.msc.

Publish both CRL and Delta CRL.

The files should be created inside C:\inetpub\wwwroot\pki. The Subordinate CA certificate has to be copied manually and named properly. You can ignore the fact that I have 2 Subordinate CA certificates. You should only see one.

Pkiview.msc is also happy:

After everything is set, you can shut down the offline CA. You only have to start it once a year when publishing the CRL.

At last, publish the Root certificate in Active Directory with certutil. This can be also achieved with GPO.

certutil.exe -f -dspublish AJNI-Root-CA.crt RootCA

Reading time: 4 min
Cloud Computing•Hyper-V•VDI•Virtualization•VMware•Windows•Windows Server

Quick Tip: Task Manager in RDP Session

June 8, 2020 by AJNI No Comments

Here is a cool trick that not everyone might know (I didn’t).

If you want to open Task Manager inside an RDP session, CTRL+ALT+DEL won’t work, right? That key combination would trigger on your local computer.

For remote sessions, there is CTRL+SHIFT+ESC.

This shortcut directly opens Task Manager, no additional steps required!

Reading time: 1 min
Hyper-V•Virtualization•Windows Server

Windows Server 2019: Installing the first Domain Controller in a new domain

October 22, 2019 by AJNI No Comments

So last time we created a Master-VHDX on Hyper-V with Windows Server 2019 in order to save space. Today we are installing the first Domain Controller with a fresh domain. Very straight forward stuff.

Before installing Active Directory Directory Services, the computer should have a decent name.

Give it a fixed IP address. Since this is going to be a lab, I am not going to plan the IP design. The Default Gateway does not exist yet. Also, the secondary DNS server will be installed later on a Server Core version.

From Server Manager Add Roles and Features, Select Role-based or feature-based installation

Select the Active Directory Directory Services Role

Everything else can be left on default.

Once the installation is completed, the server can be promoted to a Domain Controller.

Since there is no existing forest, the root domain name must be defined:

Define a new password for the Directory Services Restore Mode (DSRM). DSRM allows you to perform an authoritative restore of single or multiple AD objects through ntdsutil (from cmd).

This warning can be safely ignored.

The NetBIOS domain name can be used when logging into a domain computer, for example AJNI\Domainuser. The UserPrincipalName can be also used – domainuser@ajni.it.

The rest can be left to default.

The server will restart, after that the domain will be up and running!

The next blog post will be covering the installation of an additional Domain Controller (the second DNS server 10.10.10.11) with Windows Server 2019 Core Edition.

Stay tuned !

Reading time: 1 min
Cloud Computing•Hyper-V•Virtualization•Windows Server

Hyper-V: Create a master VHDX with Differencing Disks

October 4, 2019 by AJNI No Comments

Hyper-V has a very interesting feature that allows to save a lot of space: By creating a golden VHDX Disk with the base operating system, you can then use so called “Differencing” disks, which reference the Master VHDX and only save the changes on their disk.

So, first things first: Just create a normal VM to prepare the golden image for later use.

Hyper-V Specify Name and Location

Specify Generation 2

Hyper-V specify VM generation

Give the Golden disk a self-explanatory name

Hyper-V Connect Virtual Hard Disk

Before starting the VM, disable automatic checkpoints (in VMware known as Snapshots) and give it more juice. Do not forget to apply changes:

Hyper-V VM Settings-Checkpoints
Hyper-V VM Setting Processor

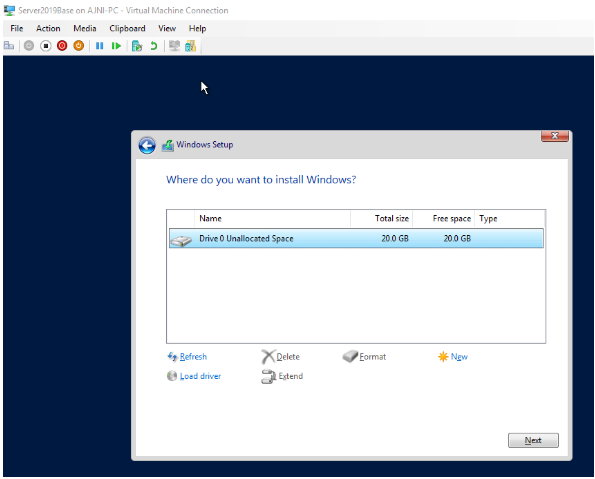
Install the OS (standard procedure)

Once the OS installed and custom settings are made, the machine is ready to be Sysprep’ed.

Windows+R sysprep
Sysprep

Delete the VM once stopped, the disk will not be deleted. Then locate the VHDX and set it into Read-Only mode.

Hyper-V delete Virtual Machine
File Properties

Now a new VM can be created in Hyper-V with a Differencing disk. Note: In the VM creation wizard specify “Attach a virtual disk later”:

Attach a virtual Disk later

Now in the VM settings under SCSI Controller add a new Hard Drive:

Hyper-V VM Settings New Hard Drive

Select the last option for Differencing:

Differencing Disk

This will be the new disk name:

Hyper-V New Disk Name

And finally, the base disk we created previously:

Specify Parent Disk

Before powering on the machine make sure the new disk is first in the boot order.

Hyper-V VM Settings Boot Options

The VM is up and running!

Windows Server 2019 Settings

Notice the size of the new VHDX. Only 1.4 GB!

Windows Explorer File Size

In the VM settings you can once again inspect the disk and see the relationship with the golden disk.

Hyper-V Inspect Hard Drive
Hyper-V Virtual Hard Disk Properties
Reading time: 1 min
Hyper-V•Powershell•VMware•Windows•Windows Server

How to enable AD Recycle Bin

March 23, 2019 by AJNI No Comments

With Windows Server 2008 R2, Active Directory has now a recycle bin. With this feature you do not have to use for example Windows Server Backup to initiate an authoritative AD restore, instead you can quickly recover deleted Users, OUs, Groups and other objects through Active Directory Administrative Center (Windows Server 2012 an upwards) or PowerShell

Enabling AD Recycle Bin (PowerShell commands

Enable-ADOptionalFeature ‘Recycle Bin Feature’ -Scope ForestOrConfigurationSet -Target ajni.lab

Type A (=Yes to All) to enable the feature

(Optional) Check Deleted Object’s Lifetime

Get-ADObject “CN=Directory Service,CN=Windows NT,CN=Services,CN=Configuration,DC=ajni,DC=lab” -Property msDS-DeletedObjectLifetime | fl

If you do not see the Property named “msDS-DeletedObjectLifetime”, it means that it has the default value of 60 days.

You can change is with this command – do not forget to replace DC=ajni, DC=lab with your domain name:

Set-ADObject -Identity “CN=Directory Service,CN=Windows NT,CN=Services,CN=Configuration, DC=ajni,DC=lab” -Partition “CN=Configuration, DC=ajni,DC=lab” -Replace:@{“msDS-DeletedObjectLifetime” = 120}

Checking the property again, you‘ll see your new value:

You can also have a look at this property with ADSIedit:

Restoring an Object

In our example we deleted an OU called “ImportantOU”

Let’s list all Deleted Objects:

Get-ADObject -filter ‘isdeleted -eq $true -and name -ne “Deleted Objects”‘ -includeDeletedObjects

And then restore our important OU. Before Restoring we can check if the Filter finds our OU:

Get-ADObject -Filter ‘msDS-LastKnownRDN -eq “ImportantOU”‘ -IncludeDeletedObjects

Now restore:

Get-ADObject -Filter ‘msDS-LastKnownRDN -eq “ImportantOU”‘ -IncludeDeletedObjects | Restore-ADObject

Our important OU is back from the dead:

We can also restore from Active Directory Administrative Center (ADAC)

Note that while AD Recycle Bin gives you the flexibility of quickly restoring deleted AD Objects, you should also have a functional Windows Server Backup and VM Backup with solutions like HPE Data Protector or VEEAM. Just in case something goes horribly wrong!

Reading time: 1 min
Page 2 of 2«12

Like what you are reading? Buy me a coffee.

Tip Of the Day

  • Add Alias to Windows Fileserver (Server 2019, 2022, 2025)

    3 weeks ago

Keep in touch

Oh hi there!
It’s nice to meet you.

Sign up to receive awesome content in your inbox, every month.

Check your inbox or spam folder to confirm your subscription.

Categories

  • AI & Deep Learning (1)
  • Azure (20)
  • Citrix XenApp (21)
  • Citrix Xendesktop (13)
  • Cloud Computing (40)
  • Coding (1)
  • Hyper-V (10)
  • Linux (8)
  • Microsoft 365 (26)
  • Powershell (21)
  • Security (7)
  • VDI (16)
  • Virtualization (21)
  • VMware (12)
  • Windows (21)
  • Windows Client OS (39)
  • Windows Server (92)

Archives

  • May 2025
  • April 2025
  • February 2025
  • January 2025
  • December 2024
  • November 2024
  • October 2024
  • September 2024
  • July 2024
  • June 2024
  • May 2024
  • April 2024
  • March 2024
  • February 2024
  • January 2024
  • December 2023
  • September 2023
  • August 2023
  • July 2023
  • June 2023
  • April 2023
  • March 2023
  • January 2023
  • December 2022
  • November 2022
  • October 2022
  • September 2022
  • August 2022
  • July 2022
  • June 2022
  • May 2022
  • February 2022
  • January 2022
  • December 2021
  • November 2021
  • October 2021
  • September 2021
  • August 2021
  • June 2021
  • May 2021
  • April 2021
  • March 2021
  • February 2021
  • December 2020
  • November 2020
  • September 2020
  • August 2020
  • July 2020
  • June 2020
  • May 2020
  • April 2020
  • March 2020
  • February 2020
  • November 2019
  • October 2019
  • September 2019
  • August 2019
  • July 2019
  • June 2019
  • May 2019
  • April 2019
  • March 2019

ajni IT © 2019