Home
Microsoft 365
Linux
Windows
Powershell
Cloud Computing
    Citrix Xendesktop
    Citrix XenApp
Useful links
About
  • Home
  • Microsoft 365
  • Linux
  • Windows
  • Powershell
  • Cloud Computing
    • Citrix Xendesktop
    • Citrix XenApp
  • Useful links
  • About
ajni.IT -
Cloud Computing•Linux•Security

Linux Apache2 Virtual Hosts with different users

September 15, 2020 by AJNI No Comments

Apache Virtual Hosts are great because they let you host multiple websites on the same server. The public IP address can also be re-used – Apache knows, based on the HTTP host header, which website to show.

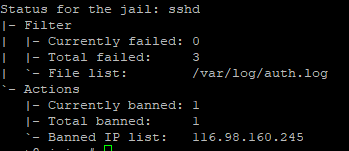
But have you considered this scenario? website1.com gets compromised and some malicious person has access to the server. What can they do? Most certainly they have access to every other website on the server because, by default, every Virtual Host runs under the same user www-data. Fortunately, there is a module that allows us to use different users for every Apache2 Virtual Host called apache2-mpm-itk.

It is very easy to install:

apt-get install libapache2-mpm-itk

a2enmod mpm_itk

If you face any issues, disable mpm-prefork and try enabling mpm_itk again.

a2dismod mpm_prefork

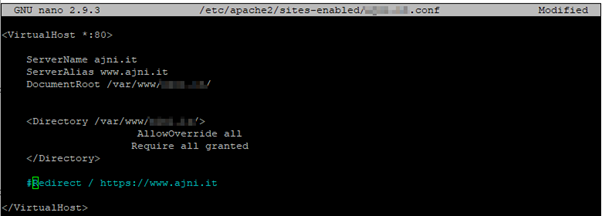
Now, in the Virtual Host config file, insert these lines (user www-site1 and group www-site1):

<IfModule mpm_itk_module>
AssignUserId www-site1 www-site1
</IfModule>

The user could be added with useradd:

useradd www-site1

Lastly, give owner rights to the new user and no one else.

chown www-site1:www-site1 -R /var/www/site1

Or even better, give the www-site user write rights on the upload folder. Everything else is readable only.

find /var/www/site1/ -type d -exec chmod 0755 {} \; #Change directory permissions rwxr-xr-x

find /var/www/site1/ -type f -exec chmod 0644 {} \; #Change file permissions rwxr-xr-x

chown ajni:ajni -R /var/www/site1/ # Let your useraccount be owner

chown www-site1:www-site1 -R /var/www/site1/uploads/ #Let apache be owner of upload folder

Oh yeah. Don’t forget to restart apache:

service apache2 restart

References:

https://cloudkul.com/blog/apache-virtual-hosting-with-different-users/

Reading time: 1 min
Linux•Security

Set up Fail2Ban for SSH on Linux (Debian/Ubuntu)

June 16, 2020 by AJNI No Comments

The first step to securing your SSH configuration is to configure key-based authentication and not allow password authentication at all. That topic has already been discussed. Check out my post about that: https://www.ajni.it/2020/03/configure-ssh-key-based-authentication-on-a-linux-system/

The second step is to introduce an Intrusion Detection System (IDS or IPS). Fail2ban can achieve that specific goal. It analyses SSH authentication logs (it can be also set for other services) and blacklists IP addresses after n failed attempts with the help of iptables (firewall rules). Let’s check it out.

First of all make sure to update your system:

apt update

apt upgrade

Now install fail2ban:

apt install fail2ban

Start and enable the fail2ban service:

systemctl start fail2ban

systemctl enable fail2ban

Now a “jail” can be configured for failed ssh login attempts. There is a default /etc/fail2ban/jail.conf file, but we are going to create a new config jail.local.

nano /etc/fail2ban/jail.local

Paste following parameters in the file:

[sshd]
enabled = true
port = 22
filter = sshd
logpath = /var/log/auth.log
maxretry = 3
mode = aggressive
bantime = -1
findtime = 3600

Mode=aggressive includes failed attempts with public key authentication. Bantime = -1 is for persistent bans. Findtime indicates how far back logs are checked (now – 3600 minutes or 1 hour).

After saving the file, restart fail2ban:

service fail2ban restart

Blacklisted IPs can be viewed with

fail2ban-client status sshd

After some minutes one IP already showed up:

Or you can also view it with iptables.

iptables -L -n -v

Removing an IP from the blacklist is also easy (the command is self-explanatory)

fail2ban-client set sshd unbanip 10.10.10.1

Some other security considerations:

  • Don’t log in as root and do not allow user root over SSH
  • Use public-key authentication
  • Change the SSH port
  • Implement an IDS/IPS (fail2ban)

References:

https://www.techrepublic.com/article/how-to-install-fail2ban-on-ubuntu-server-18-04/

https://serverfault.com/questions/686422/modify-fail2ban-failregex-to-match-failed-public-key-authentications-via-ssh/686436

https://security.stackexchange.com/questions/188908/what-is-this-ssh-attack-am-i-hacked

https://www.liquidweb.com/kb/install-configure-fail2ban-ubuntu-server-16-04/

https://serverfault.com/questions/808866/get-fail2ban-to-check-findtime-every-x-minutes

Reading time: 1 min
Coding•Linux

Automatic SSL certificate renewal with ZeroSSL API and Python 3

May 24, 2020 by AJNI 7 Comments

A while ago I wrote an article that described all the steps necessary to obtain a free SSL certificate with a validity of 90 days. Check it out: https://www.ajni.it/2019/06/claiming-a-free-ssl-certificate-for-your-website/

While it’s good to know how things work, the task gets boring and repetitive if you have to do it every 3 months and in my case for two different domains. This is why I wrote a small and straightforward script in Python3 that does that all for me.

ZeroSSL offers an API that allows us to automate this task by making some HTTP calls with an API key obtainable after registering.

I have uploaded the script on GitHub, check it out:

https://github.com/ajnik/ZeroSSL-CertRenew

There are some variables that must be changed:

  • Line 19: API key
  • Line 20: Domain name
  • Line 43 to 52: Request paramteres (O, OU, L, ST, C)

Execute the script with

python3 ZeroSSL_CertRenew.py

The script does no exception handling. I might improve it in the future.

Let me know if you have any suggestions. I am pretty new to Python programming so every tip is welcome.

Reading time: 1 min
Cloud Computing•Linux•Virtualization

Host your WordPress site on Ubuntu 18.04 with Apache2, MySQL and PHP

May 21, 2020 by AJNI No Comments

Today I got a new Linux VPS, therefore I decided to show you all the steps I took to migrate to my WordPress site to the new server.

So let’s get started.

Firstly, it is always good practice to update the OS.

apt update

apt upgrade

Install apache2

apt install apache2

Install php7.3. By default, version 7.3 will not be detected. The repository PPA must be added. You might need the first command if the “add-apt-repository” is not available.

apt install software-properties-common

add-apt-repository ppa:ondrej/apache2

apt-get install php7.3

You should see the Apache2 default site if you enter the IP address in your browser:

Now enable the MySQL extension in the PHP config file:

nano /etc/php/7.3/apache2/php.ini

Remove the comment (semicolon) at extension=pdo_mysql. You can search with CTRL+W in Nano GNU editor.

CTRL+X saves the file.

Now install php7.3-mysql

apt-get install php7.3-mysql

The root directory of your WordPress files can be created:

mkdir -p /var/www/website

Make a config file for Apache2 from the default config.

cp /etc/apache2/sites-available/000-default.conf /etc/apache2/sites-available/website.conf

Change the config file. ServerName and ServerAlias should be your site name along with the DocumentRoot.

I use https exclusively, check my tutorial if you want to know how it is done (I highly recommend using https): https://www.ajni.it/2019/06/claiming-a-free-ssl-certificate-for-your-website/

nano /etc/apache2/sites-available/website.conf

Enable the site:

a2ensite website.conf

Reload the service like advised.

service apache2 reload

Download the latest WordPress version from https://wordpress.org/latest.tar.gz.

Since I am doing a migration, I just unzipped the files from my backup.

cd /var/www/website

wget https://wordpress.org/latest.tar.gz -O wordpress.tar.zip && tar -xzvf wordpress.tar.zip

mv wordpress/* .

Install MySQL server

apt-get install mysql-server

Now create a new database and a user in MySQL. As root you don’t have to enter a password.

mysql -u root -p

CREATE DATABASE wordpress;

CREATE USER ‘someusername’@’localhost’ IDENTIFIED BY ‘somepassword’;

GRANT ALL PRIVILEGES ON wordpress . * TO ‘someusername’@’localhost’;

I have to import the WordPress database from backup:

mysql -u root -D wordpress < db_20-05-2020.db

exit

Now you can access the WordPress through a browser, you will be asked to enter a site name, username with a password, etc.

You might also need to enable URL rewriting for Permalinks.

a2enmod rewrite

Disabling the default site is also a good idea

a2dissite 000-default.conf

There are some other important things you should enable in order to secure your server properly.

nano /etc/apache2/apache2.conf

These lines will not advertise the Apache2 version, enforce TLS 1.2 and strong ciphers, while unsafe ones (like MD5) are discarded.

ServerTokens Prod

SSLProtocol TLSv1.2

SSLHonorCipherOrder On

SSLCipherSuite ECDH+AESGCM:ECDH+CHACHA20:DH+AESGCM:ECDH+AES256:DH+AES256:ECDH+AES128:DH+AES:RSA+AESGCM:RSA+AES:!aNULL:!MD5:!DSS:!AESCCM

service apache2 restart

That’s it. If you have questions, just comment down here!

Reading time: 2 min
Cloud Computing•Linux•Virtualization

Installing OpenVPN on Ubuntu 18.04 Minimal

March 16, 2020 by AJNI No Comments

A few days ago I bought a very cheap Virtual Private Server (VPS) – check my post here: https://www.ajni.it/2020/03/quick-tip-cheap-private-servers-on-the-cloud/

It was very cheap (4$ or 3.75€ annually), but with a lot of gotchas.

One of them is Ubuntu 18.04 Minimal, which means a lot of packages will not be pre-installed, causing a lot of pain when installing services like in my example OpenVPN.

Here is how I managed to install OpenVPN on Ubuntu 18.04 Minimal.

Updating the system:

apt update

apt upgrade

Install OpenVPN

wget https://git.io/vpn -O openvpn-install.sh && bash openvpn-install.sh

The first problem occurs with the root CA certificates:

Install the root certificates in order to trust them:

apt-get install ca-certificates

After re-running the command, another error shows up:

Install the next package (iptables):

apt-get install iptables

And finally, the OpenVPN setup can be run:

I had to set a custom port, because only specific ones were NAT’d to my server. You might leave the port to default. I am also using 1.1.1.1 for DNS.

After the setup is finished, a configuration file will be created. This file contains the public certificates and private key that are mandatory for the connection. It can be imported into the OpenVPN client (Windows) through the GUI.

On Linux, a simple

openvpn configfile.ovpn

does the trick.

If you are looking for a VPS with good performance, check out Evolution Host at https://evolution-host.com/vps-hosting.php.
They offer virtual servers starting at 5€ per month.

Reading time: 1 min
Page 1 of 212»

Tip Of the Day

  • Citrix Virtual Apps and Desktops 2203+ grey screen/ConnectionFailure in Eventviewer

    3 days ago

Keep in touch

Oh hi there!
It’s nice to meet you.

Sign up to receive awesome content in your inbox, every month.

Check your inbox or spam folder to confirm your subscription.

Categories

  • AI & Deep Learning (1)
  • Azure (14)
  • Citrix XenApp (15)
  • Citrix Xendesktop (8)
  • Cloud Computing (32)
  • Coding (1)
  • Hyper-V (9)
  • Linux (8)
  • Microsoft 365 (15)
  • Powershell (14)
  • Security (6)
  • VDI (10)
  • Virtualization (18)
  • VMware (9)
  • Windows (21)
  • Windows Client OS (24)
  • Windows Server (61)

Archives

  • March 2023
  • January 2023
  • December 2022
  • November 2022
  • October 2022
  • September 2022
  • August 2022
  • July 2022
  • June 2022
  • May 2022
  • February 2022
  • January 2022
  • December 2021
  • November 2021
  • October 2021
  • September 2021
  • August 2021
  • June 2021
  • May 2021
  • April 2021
  • March 2021
  • February 2021
  • December 2020
  • November 2020
  • September 2020
  • August 2020
  • July 2020
  • June 2020
  • May 2020
  • April 2020
  • March 2020
  • February 2020
  • November 2019
  • October 2019
  • September 2019
  • August 2019
  • July 2019
  • June 2019
  • May 2019
  • April 2019
  • March 2019

ajni IT © 2019