Mailing is daily business in an organization and to increase the trustworthiness of your domain, you should firstly configure a TXT/SPF record and secondly configure DomainKeys, also known as DKIM.
DKIM works by adding a digital signature to the header of an email message that verifies that the message was sent from a trusted source and has not been tampered with during transmission.
When an email is sent using DKIM, the sender’s domain name is included in the digital signature. This allows the receiving email server to verify that the message was sent from an authorized sender and that the message has not been modified in transit. If the digital signature is valid, the email is considered to be legitimate and is delivered to the recipient’s inbox. If the digital signature is invalid, the email is likely to be marked as spam or blocked entirely.
Configuring DKIM if you have Microsoft 365 Exchange Online as a mail system is very straightforward. Just go to https://security.microsoft.com/dkimv2 and enable DKIM on the corresponding domain. Afterwards create the DNS entries as instructed by Microsoft 365.
Usually you’ll have 2 entries, for example:
selector1 and selector2._domainkey.ajni.it CNAME pointing to a Microsoft internal DNS entry.After creating the DNS entries (like usual you’ll have to wait a bit because of DNS and its slowness), you can verify them in the M365 portal and activate the DKIM signature on all emails (see reference below).
If you have a newsletter solution that does not use Microsoft 365 to send emails, you should check whether they offer DKIM (they should otherwise it’s not a proper newsletter software). Usually you’ll have to configure two CNAME DNS entries on your domain with a selector, similar to Microsoft 365:
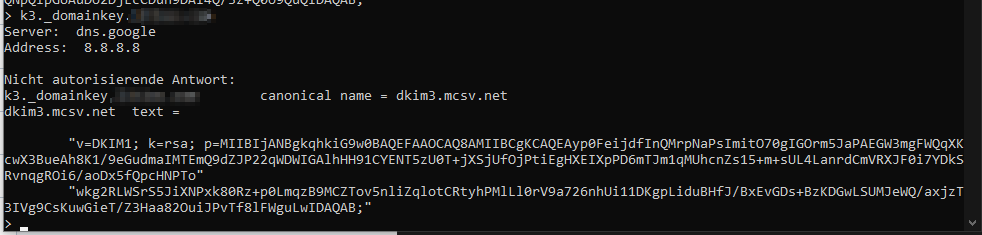
k1_domainkey.domain.com and k2_domainkey.domain.com CNAME points to the newsletter solution domain. The TXT record of that DNS record contains the public key. See mailchimp for example:
Looking at the message headers, you can see that domain signature is all right:
ARC-Authentication-Results i=2; mx.google.com; dkim=pass header.i=@ajni.it header.s=selector1 header.b=TJJLfT54; arc=pass (i=1 spf=pass spfdomain=ajni.it dkim=pass dkdomain=ajni.it dmarc=pass fromdomain=ajni.it); spf=pass (google.com: domain of test@ajni.it designates 2a01:111:f400:7e24::614 as permitted sender) smtp.mailfrom=test@ajni.itThe next step would be to configure a DMARC policy, so that someone trying to impersonate your domain gets rejected and reported to you.
When an email is received, the receiving email server checks the sender’s domain for a DMARC policy, and then follows the instructions specified in that policy to determine whether the email is legitimate or not.
A sample DMARC policy would look like this:
_dmarc.ajni.it TXT
v=DMARC1; p=reject; rua=mailto:dmarcreports@example.com; ruf=mailto:dmarcfailures@example.com; sp=none; aspf=r;
This policy tells email receivers to reject any messages that fail authentication checks (p=reject), and to send aggregate and forensic DMARC reports to the specified email addresses (rua and ruf). The policy also indicates that the domain owner is not enforcing a policy for messages that do not pass SPF checks (sp=none), and that they are requesting SPF-aligned messages to be treated as passing but are not requiring DKIM alignment to pass (aspf=r).
This is just an example and policies may vary depending on the organization’s specific needs and email infrastructure.
References: