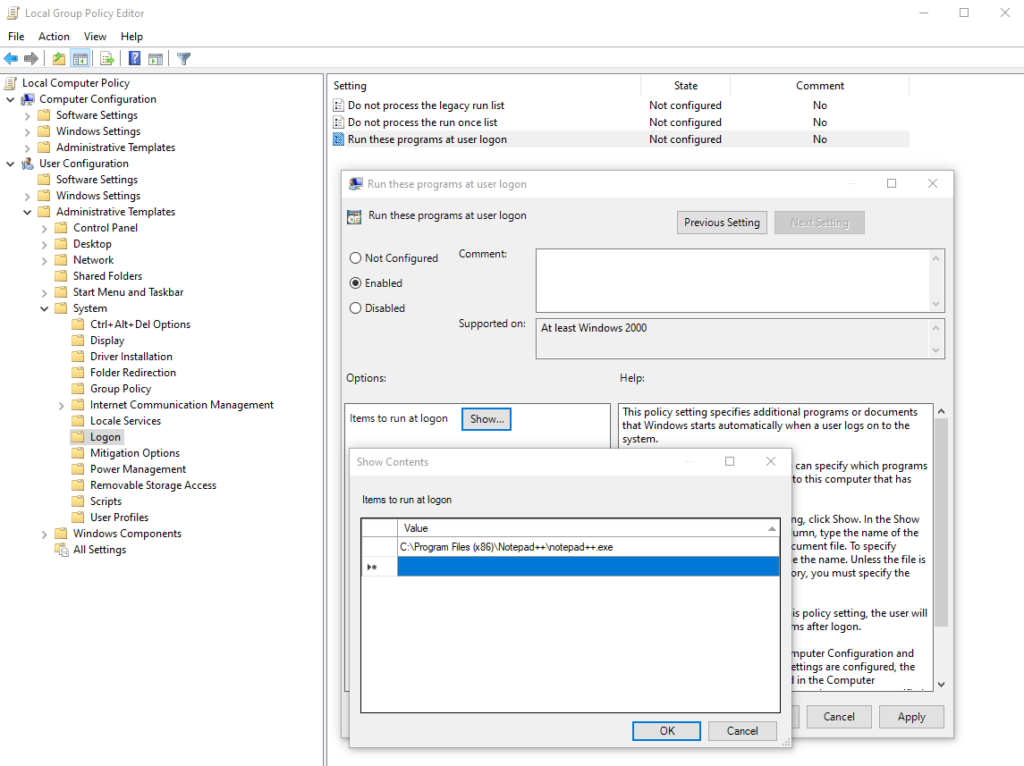
Home
Microsoft 365
Linux
Windows
Powershell
Cloud Computing
    Citrix Xendesktop
    Citrix XenApp
Useful links
About
  • Home
  • Microsoft 365
  • Linux
  • Windows
  • Powershell
  • Cloud Computing
    • Citrix Xendesktop
    • Citrix XenApp
  • Useful links
  • About
ajni.IT -
Azure•Citrix XenApp•Citrix Xendesktop•Cloud Computing•Powershell

How to use a custom Azure VM type on Citrix MCS (On-Prem and Citrix Cloud)

July 27, 2020 by AJNI No Comments

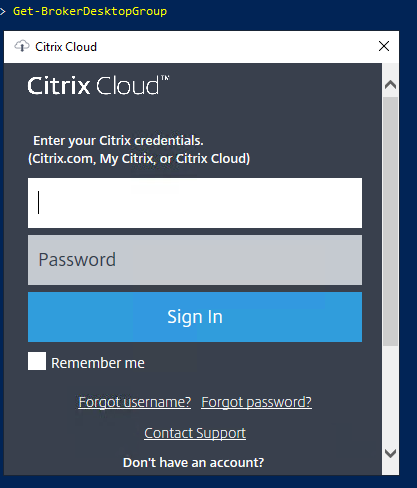
If you are using Citrix MCS with Azure VMs, you might have noticed that not all the VM SKUs are available to select when creating a new Machine Catalog. With PowerShell, though, you can use any Azure VM SKUs.

If you are using Citrix Cloud, you have to download and install the Citrix Powershell SDK and login with your Citrix credentials. Optionally you could download an API client and authenticate with those credentials.

The secure client can be downloaded under Identity and Access Management > API Access > Create client. The customer id will also be shown on that page.

You authenticate with the API client this way:

Set-XDCredentials -CustomerId “customername” -SecureClientFile “C:\temp\secureclient.csv” -ProfileType CloudAPI

Otherwise, without API credentials, after executing the first command, you will be asked to insert your Citrix credentials:

Now the commands to change the Citrix MCS VM type.

Get-ProvScheme -ProvisioningSchemeName “CatalogName”

Take note of the folder name after XDHYP:\HostingUnits\ under MasterImageVM.

This command will register the virtual drive XDHYP:\ in PowerShell:

Set-HypAdminConnection

Insert that folder name in this command:

Set-ProvScheme –ProvisioningSchemeName “CatalogName” –ServiceOffering “XDHyp:\HostingUnits\Foldername\serviceoffering.folder\Standard_NV4as_v4.serviceoffering”

Delete and re-create the VM. The right VM type will be then used.

Reading time: 1 min
Azure•Cloud Computing

Add an existing VM to an Availability Set in Azure

July 20, 2020 by AJNI No Comments

Normally, adding an Availability Set after the VM has been deployed is not possible. You would have to delete the VM, leaving the NIC and OS disk intact and then re-creating the VM with the Availability Set. Of course that can be done manually, but there is a PowerShell script that does this all for us.

This can be all done in the Azure Cloud Shell, you do not have to install the PowerShell Module on a Windows Machine.

Install-Module AzureRm.AvailabilitySetManagement

Create an AS before adding the VM to the AS.

New-AzureRmAvailabilitySet -Location “West Europe” -Name “myAs” -ResourceGroupName “myRg” -Sku aligned -PlatformFaultDomainCount 3 -PlatformUpdateDomainCount 5

Now add the VM to the AS:

Add-AzureRmAvSetVmToAvailabilitySet -ResourceGroupName “myRg” -VMName “VM01” -OsType windows -AvailabilitySet “myAs”

This will stop the VM if it is running, delete the VM item (leaving the NIC and OS disk intact) and re-create that with the same VM size inside the newly created Availability Set.

References:

https://pixelrobots.co.uk/2018/02/add-existing-virtual-machine-availability-set-azure/

https://gist.github.com/PixelRobots/3c34027d225c7acb09833840b7258ee9#file-movevmavaset-ps1

Reading time: 1 min
Cloud Computing•Virtualization•VMware•Windows•Windows Server

Linked Clones in VMware Workstation

July 13, 2020 by AJNI No Comments

A while ago I made a blog post about Differencing Disks in Hyper-V. If you mainly work with Hyper-V, you should check it out: https://www.ajni.it/2019/10/hyper-v-create-a-master-vhdx-to-save-tons-of-space/. VMware Workstation utilizes a similar concept, called Linked Clones.

Linked Clones use a read-only disk as a reference, changes made to the VM are written into a separate writable disk. This technique allows us to save disk space and create a lot of VMs. Changes, at least in the beginning after the OS installation, are very small.

Install Windows 10 or Windows Server along with VMware Tools and then Sysprep your VM.

Now the template can be “cloned”

In VMware, a Differencing Disk is called Linked Clone. Just like in a snapshot, a linked clone uses a base read-only disk and saves changes into second, writable disk.

Now a name for the new VM can be inserted.

After booting up the new VM, we can see that the writable disk only consumes 7MB. 4GB are used for the memory state.

This feature is awesome for home labs. You can create multiple VMs off of that single base disk. In a lab, changes are usually very small, so you can save a ton of space using this method. I would not recommend updating your system through Windows Updates or enabling Bitlocker.

If for some reason the base disk is corrupt or lost though, every VM will be affected.

Reading time: 1 min
Azure•Cloud Computing

Create Azure Service Principals with Azure Powershell

June 29, 2020 by AJNI No Comments

An Azure Service Principal is a service account created in Azure AD and can be leveraged in PowerShell scripts for automation. It is recommended to use Service Principals for security reasons since they have separate credentials and very constrained rights.

You can either use password-based authentication or certificate-based authentication with Service Principals. In this article, only password-based authentication is covered. Certificate-based authentication is treated in the Microsoft article linked at the end of the page.

First of all, the Az Powershell Module is needed.

Install-Module -Name Az -AllowClobber -Scope Allusers

If you have multiple subscriptions, make sure you have selected the correct one.

Get-AzSubscription

Select-AzSubscription -SubscriptionId xxxxxxxxx

Now create the Principal:

$sp = New-AzADServicePrincipal -DisplayName PowershellAutomation

The $sp object contains a secret parameter (the password), which is not in clear-text and an ApplicationID, that will be used as the username. To decrypt the secret parameter use the following commands:

$BSTR = [System.Runtime.InteropServices.Marshal]::SecureStringToBSTR($sp.secret)
$UnsecurePassword = [System.Runtime.InteropServices.Marshal]::PtrToStringAuto($BSTR)

In a script the $UnsecurePassword should not be hardcoded, instead, it should be saved as an encrypted XML file and decrypted when the script is executed. I wrote a post about securing credentials in PowerShell scripts, check it out: https://www.ajni.it/2020/05/powershell-encrypt-and-store-your-credentials-securely/.

Logging in is also straightforward. The Tenant id can be retrieved in the main page of Azure AD.

Connect-AzAccount -ServicePrincipal -Credential $credentials -Tenant xxxxx

When assigning rights, the newly created identity will be listed:

References:

https://docs.microsoft.com/en-us/powershell/azure/create-azure-service-principal-azureps?view=azps-3.8.0

Reading time: 1 min
Azure•Cloud Computing

Create a custom IAM Role in Microsoft Azure

June 22, 2020 by AJNI No Comments

Azure has a lot of pre-defined roles, but you can also create very specific roles with the help of Azure Powershell or Bash and a JSON config file. In this example, the user that gets this role is only able to start, stop, or restart a VM.

Start off by opening the cloud shell. If this is the first time opening it, a storage account must be created.

Create a new json config file and insert the following:

code role.json

{
"Name": "Virtual Machine Operator",
"IsCustom": true,
"Description": "Can deallocate, start and restart virtual machines.",
"Actions": [
"Microsoft.Compute/*/read",
"Microsoft.Compute/virtualMachines/start/action",
"Microsoft.Compute/virtualMachines/restart/action",
"Microsoft.Compute/virtualMachines/deallocate/action"
],
"NotActions": [
, "AssignableScopes": [ "/subscriptions/xxxx" ]
}

You can save with CTRL+S and exit the visual editor with CTRL+Q.

The role grants read permission and allow to start, restart, and stop the VM. Do not forget to add your subscription id at the end (line 16).

Create the role based off the template:

az role definition create –role-definition role.json

When assigning a role the custom role should also be listed. You can either assign this role to a Resource Group or the VM directly.

References:

https://stackoverflow.com/questions/23668154/allow-users-to-start-stop-particular-azure-vms

Reading time: 1 min
Page 20 of 24« First...10«19202122»...Last »

Like what you are reading? Buy me a coffee.

Tip Of the Day

  • Convert Cloud User to synched User (Updated 2025)

    5 hours ago

Keep in touch

Oh hi there!
It’s nice to meet you.

Sign up to receive awesome content in your inbox, every month.

Check your inbox or spam folder to confirm your subscription.

Categories

  • AI & Deep Learning (1)
  • Azure (20)
  • Citrix XenApp (21)
  • Citrix Xendesktop (13)
  • Cloud Computing (40)
  • Coding (1)
  • Hyper-V (10)
  • Linux (8)
  • Microsoft 365 (26)
  • Powershell (22)
  • Security (7)
  • VDI (16)
  • Virtualization (21)
  • VMware (12)
  • Windows (21)
  • Windows Client OS (40)
  • Windows Server (94)

Archives

  • December 2025
  • August 2025
  • May 2025
  • April 2025
  • February 2025
  • January 2025
  • December 2024
  • November 2024
  • October 2024
  • September 2024
  • July 2024
  • June 2024
  • May 2024
  • April 2024
  • March 2024
  • February 2024
  • January 2024
  • December 2023
  • September 2023
  • August 2023
  • July 2023
  • June 2023
  • April 2023
  • March 2023
  • January 2023
  • December 2022
  • November 2022
  • October 2022
  • September 2022
  • August 2022
  • July 2022
  • June 2022
  • May 2022
  • February 2022
  • January 2022
  • December 2021
  • November 2021
  • October 2021
  • September 2021
  • August 2021
  • June 2021
  • May 2021
  • April 2021
  • March 2021
  • February 2021
  • December 2020
  • November 2020
  • September 2020
  • August 2020
  • July 2020
  • June 2020
  • May 2020
  • April 2020
  • March 2020
  • February 2020
  • November 2019
  • October 2019
  • September 2019
  • August 2019
  • July 2019
  • June 2019
  • May 2019
  • April 2019
  • March 2019

ajni IT © 2019