Home
Microsoft 365
Linux
Windows
Powershell
Cloud Computing
    Citrix Xendesktop
    Citrix XenApp
Useful links
About
  • Home
  • Microsoft 365
  • Linux
  • Windows
  • Powershell
  • Cloud Computing
    • Citrix Xendesktop
    • Citrix XenApp
  • Useful links
  • About
ajni.IT -
Powershell

PowerShell – Encrypt and store credentials securely

May 28, 2020 by AJNI No Comments

Saving credentials and secrets inside your code is a very bad idea and should be avoided. PowerShell has built-in commands to export and import encrypted data in your code.

There might be a lot of ways to achieve this, but this is how I like to do it. This is very elegant and easy to implement.

Let’s say we have a secret password that we want to secure and avoid saving in the source code.

$secretPW = “SecretPassword” | ConvertTo-SecureString -AsPlainText -Force

We can export this variable to an encrypted XML file with

$secretPW | Export-Clixml -Path .\secret.xml

The password is not human readable:

To import this file use

$secretPW = Import-Clixml -Path .\secret.xml

The plain-text password can be obtained through (I had to split the command into two lines)

[System.Runtime.InteropServices.Marshal]::
PtrToStringAuto([System.Runtime.InteropServices.Marshal]::SecureStringToBSTR($secretPW))

Just outputting the variable won’t show the password, because the variable is a System.Security.SecureString object.

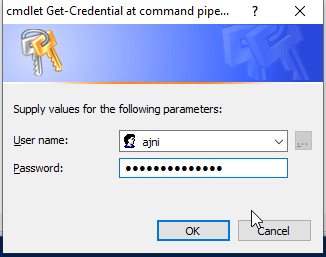
Credentials can also be saved this way:

$credentials = Get-Credential

You can show the plain-text password with

$credentials.GetNetworkCredential().password

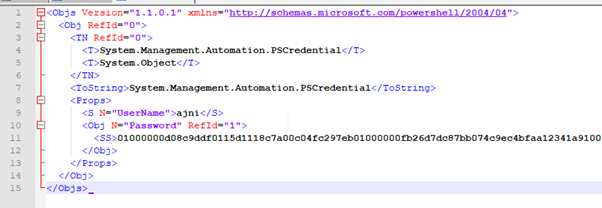
$credentials | Export-Clixml -Path .\credentials.xml

Only the username is shown in clear text.

Same thing again with the import

$credentials = Import-Clixml -Path .\credentials.xml

$credentials.GetNetworkCredential().password

The password can be decrypted by the same user that created the XML file on that specific computer.

References:

https://devblogs.microsoft.com/scripting/decrypt-powershell-secure-string-password/

https://pscustomobject.github.io/powershell/functions/PowerShell-SecureString-To-String/

Reading time: 1 min
Coding•Linux

Automatic SSL certificate renewal with ZeroSSL API and Python 3

May 24, 2020 by AJNI 7 Comments

A while ago I wrote an article that described all the steps necessary to obtain a free SSL certificate with a validity of 90 days. Check it out: https://www.ajni.it/2019/06/claiming-a-free-ssl-certificate-for-your-website/

While it’s good to know how things work, the task gets boring and repetitive if you have to do it every 3 months and in my case for two different domains. This is why I wrote a small and straightforward script in Python3 that does that all for me.

ZeroSSL offers an API that allows us to automate this task by making some HTTP calls with an API key obtainable after registering.

I have uploaded the script on GitHub, check it out:

https://github.com/ajnik/ZeroSSL-CertRenew

There are some variables that must be changed:

  • Line 19: API key
  • Line 20: Domain name
  • Line 43 to 52: Request paramteres (O, OU, L, ST, C)

Execute the script with

python3 ZeroSSL_CertRenew.py

The script does no exception handling. I might improve it in the future.

Let me know if you have any suggestions. I am pretty new to Python programming so every tip is welcome.

Reading time: 1 min
Cloud Computing•Linux•Virtualization

Host your WordPress site on Ubuntu 18.04 with Apache2, MySQL and PHP

May 21, 2020 by AJNI No Comments

Today I got a new Linux VPS, therefore I decided to show you all the steps I took to migrate to my WordPress site to the new server.

So let’s get started.

Firstly, it is always good practice to update the OS.

apt update

apt upgrade

Install apache2

apt install apache2

Install php7.3. By default, version 7.3 will not be detected. The repository PPA must be added. You might need the first command if the “add-apt-repository” is not available.

apt install software-properties-common

add-apt-repository ppa:ondrej/apache2

apt-get install php7.3

You should see the Apache2 default site if you enter the IP address in your browser:

Now enable the MySQL extension in the PHP config file:

nano /etc/php/7.3/apache2/php.ini

Remove the comment (semicolon) at extension=pdo_mysql. You can search with CTRL+W in Nano GNU editor.

CTRL+X saves the file.

Now install php7.3-mysql

apt-get install php7.3-mysql

The root directory of your WordPress files can be created:

mkdir -p /var/www/website

Make a config file for Apache2 from the default config.

cp /etc/apache2/sites-available/000-default.conf /etc/apache2/sites-available/website.conf

Change the config file. ServerName and ServerAlias should be your site name along with the DocumentRoot.

I use https exclusively, check my tutorial if you want to know how it is done (I highly recommend using https): https://www.ajni.it/2019/06/claiming-a-free-ssl-certificate-for-your-website/

nano /etc/apache2/sites-available/website.conf

Enable the site:

a2ensite website.conf

Reload the service like advised.

service apache2 reload

Download the latest WordPress version from https://wordpress.org/latest.tar.gz.

Since I am doing a migration, I just unzipped the files from my backup.

cd /var/www/website

wget https://wordpress.org/latest.tar.gz -O wordpress.tar.zip && tar -xzvf wordpress.tar.zip

mv wordpress/* .

Install MySQL server

apt-get install mysql-server

Now create a new database and a user in MySQL. As root you don’t have to enter a password.

mysql -u root -p

CREATE DATABASE wordpress;

CREATE USER ‘someusername’@’localhost’ IDENTIFIED BY ‘somepassword’;

GRANT ALL PRIVILEGES ON wordpress . * TO ‘someusername’@’localhost’;

I have to import the WordPress database from backup:

mysql -u root -D wordpress < db_20-05-2020.db

exit

Now you can access the WordPress through a browser, you will be asked to enter a site name, username with a password, etc.

You might also need to enable URL rewriting for Permalinks.

a2enmod rewrite

Disabling the default site is also a good idea

a2dissite 000-default.conf

There are some other important things you should enable in order to secure your server properly.

nano /etc/apache2/apache2.conf

These lines will not advertise the Apache2 version, enforce TLS 1.2 and strong ciphers, while unsafe ones (like MD5) are discarded.

ServerTokens Prod

SSLProtocol TLSv1.2

SSLHonorCipherOrder On

SSLCipherSuite ECDH+AESGCM:ECDH+CHACHA20:DH+AESGCM:ECDH+AES256:DH+AES256:ECDH+AES128:DH+AES:RSA+AESGCM:RSA+AES:!aNULL:!MD5:!DSS:!AESCCM

service apache2 restart

That’s it. If you have questions, just comment down here!

Reading time: 2 min

Like what you are reading? Buy me a coffee.

Tip Of the Day

  • Add Alias to Windows Fileserver (Server 2019, 2022, 2025)

    1 month ago

Keep in touch

Oh hi there!
It’s nice to meet you.

Sign up to receive awesome content in your inbox, every month.

Check your inbox or spam folder to confirm your subscription.

Categories

  • AI & Deep Learning (1)
  • Azure (20)
  • Citrix XenApp (21)
  • Citrix Xendesktop (13)
  • Cloud Computing (40)
  • Coding (1)
  • Hyper-V (10)
  • Linux (8)
  • Microsoft 365 (26)
  • Powershell (21)
  • Security (7)
  • VDI (16)
  • Virtualization (21)
  • VMware (12)
  • Windows (21)
  • Windows Client OS (39)
  • Windows Server (92)

Archives

  • May 2025
  • April 2025
  • February 2025
  • January 2025
  • December 2024
  • November 2024
  • October 2024
  • September 2024
  • July 2024
  • June 2024
  • May 2024
  • April 2024
  • March 2024
  • February 2024
  • January 2024
  • December 2023
  • September 2023
  • August 2023
  • July 2023
  • June 2023
  • April 2023
  • March 2023
  • January 2023
  • December 2022
  • November 2022
  • October 2022
  • September 2022
  • August 2022
  • July 2022
  • June 2022
  • May 2022
  • February 2022
  • January 2022
  • December 2021
  • November 2021
  • October 2021
  • September 2021
  • August 2021
  • June 2021
  • May 2021
  • April 2021
  • March 2021
  • February 2021
  • December 2020
  • November 2020
  • September 2020
  • August 2020
  • July 2020
  • June 2020
  • May 2020
  • April 2020
  • March 2020
  • February 2020
  • November 2019
  • October 2019
  • September 2019
  • August 2019
  • July 2019
  • June 2019
  • May 2019
  • April 2019
  • March 2019

ajni IT © 2019