Home
Microsoft 365
Linux
Windows
Powershell
Cloud Computing
    Citrix Xendesktop
    Citrix XenApp
Useful links
About
  • Home
  • Microsoft 365
  • Linux
  • Windows
  • Powershell
  • Cloud Computing
    • Citrix Xendesktop
    • Citrix XenApp
  • Useful links
  • About
ajni.IT -
Cloud Computing•Virtualization•VMware•Windows•Windows Server

Linked Clones in VMware Workstation

July 13, 2020 by AJNI No Comments

A while ago I made a blog post about Differencing Disks in Hyper-V. If you mainly work with Hyper-V, you should check it out: https://www.ajni.it/2019/10/hyper-v-create-a-master-vhdx-to-save-tons-of-space/. VMware Workstation utilizes a similar concept, called Linked Clones.

Linked Clones use a read-only disk as a reference, changes made to the VM are written into a separate writable disk. This technique allows us to save disk space and create a lot of VMs. Changes, at least in the beginning after the OS installation, are very small.

Install Windows 10 or Windows Server along with VMware Tools and then Sysprep your VM.

Now the template can be “cloned”

In VMware, a Differencing Disk is called Linked Clone. Just like in a snapshot, a linked clone uses a base read-only disk and saves changes into second, writable disk.

Now a name for the new VM can be inserted.

After booting up the new VM, we can see that the writable disk only consumes 7MB. 4GB are used for the memory state.

This feature is awesome for home labs. You can create multiple VMs off of that single base disk. In a lab, changes are usually very small, so you can save a ton of space using this method. I would not recommend updating your system through Windows Updates or enabling Bitlocker.

If for some reason the base disk is corrupt or lost though, every VM will be affected.

Reading time: 1 min
Cloud Computing•Windows•Windows Server

Add a second Server 2019 Core Domain Controller in the Domain

July 6, 2020 by AJNI No Comments

Server Core Edition is very lightweight, needs less Windows Updates, less disk space, and should be used whenever possible. Basic features like AD DS, DNS, DHCP, or IIS are supported on Server Core. Administering is also very easy once it is a member of the domain because it can be added to Server Manager on a server with GUI. We are installing AD DS in this article.

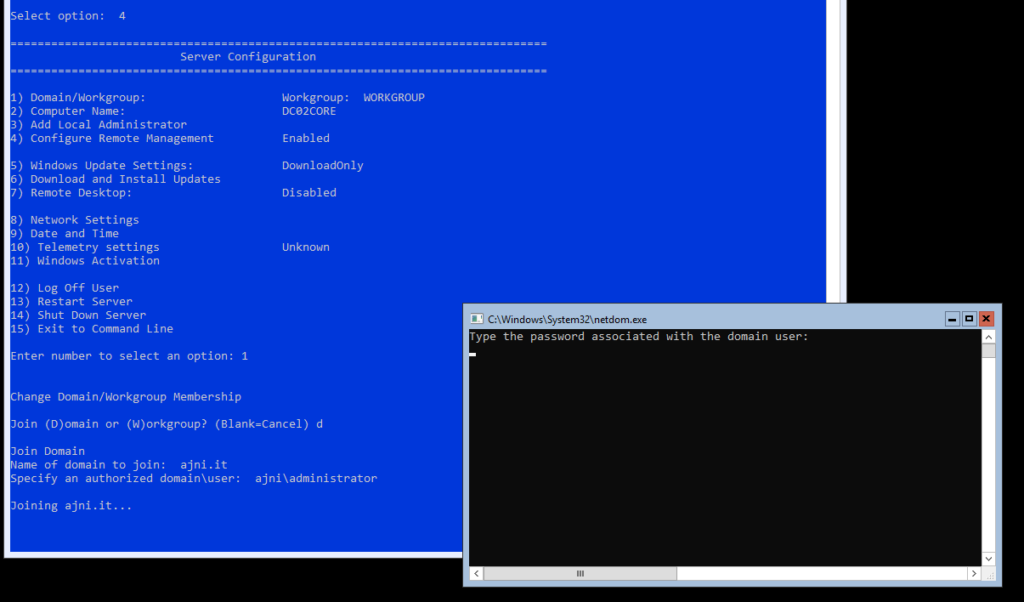
You can relatively easily change system settings on Server Core with the sconfig cmd tool.

sconfig

First change the server’s name (Option 2).

Afterwards set the IP address to a static one along with DNS servers (option 8).

Return to the main menu and perform the Domain Join (option 1).

We don’t need to change the computer name. The server will be then rebooted.

From now on, the fastest and simplest approach of administering your Windows Server Core is through Server Manager on a Server with GUI.

Add Roles and Features and promote the server to a Domain Controller. These steps are very straightforward. Some screenshots might be missing. If you want the step by step instructions, check out this post https://www.ajni.it/2019/10/server-2019-installing-your-first-domain-controller-in-a-new-domain/.

You can double check in Active Directory Users and Computers and Active Directory Sites and Services.

NTDS settings might not be created right away. Don’t panic, this might take some time. You shouldn’t create the entries manually.

Reading time: 1 min
Azure•Cloud Computing

Create Azure Service Principals with Azure Powershell

June 29, 2020 by AJNI No Comments

An Azure Service Principal is a service account created in Azure AD and can be leveraged in PowerShell scripts for automation. It is recommended to use Service Principals for security reasons since they have separate credentials and very constrained rights.

You can either use password-based authentication or certificate-based authentication with Service Principals. In this article, only password-based authentication is covered. Certificate-based authentication is treated in the Microsoft article linked at the end of the page.

First of all, the Az Powershell Module is needed.

Install-Module -Name Az -AllowClobber -Scope Allusers

If you have multiple subscriptions, make sure you have selected the correct one.

Get-AzSubscription

Select-AzSubscription -SubscriptionId xxxxxxxxx

Now create the Principal:

$sp = New-AzADServicePrincipal -DisplayName PowershellAutomation

The $sp object contains a secret parameter (the password), which is not in clear-text and an ApplicationID, that will be used as the username. To decrypt the secret parameter use the following commands:

$BSTR = [System.Runtime.InteropServices.Marshal]::SecureStringToBSTR($sp.secret)
$UnsecurePassword = [System.Runtime.InteropServices.Marshal]::PtrToStringAuto($BSTR)

In a script the $UnsecurePassword should not be hardcoded, instead, it should be saved as an encrypted XML file and decrypted when the script is executed. I wrote a post about securing credentials in PowerShell scripts, check it out: https://www.ajni.it/2020/05/powershell-encrypt-and-store-your-credentials-securely/.

Logging in is also straightforward. The Tenant id can be retrieved in the main page of Azure AD.

Connect-AzAccount -ServicePrincipal -Credential $credentials -Tenant xxxxx

When assigning rights, the newly created identity will be listed:

References:

https://docs.microsoft.com/en-us/powershell/azure/create-azure-service-principal-azureps?view=azps-3.8.0

Reading time: 1 min
Azure•Cloud Computing

Create a custom IAM Role in Microsoft Azure

June 22, 2020 by AJNI No Comments

Azure has a lot of pre-defined roles, but you can also create very specific roles with the help of Azure Powershell or Bash and a JSON config file. In this example, the user that gets this role is only able to start, stop, or restart a VM.

Start off by opening the cloud shell. If this is the first time opening it, a storage account must be created.

Create a new json config file and insert the following:

code role.json

{
"Name": "Virtual Machine Operator",
"IsCustom": true,
"Description": "Can deallocate, start and restart virtual machines.",
"Actions": [
"Microsoft.Compute/*/read",
"Microsoft.Compute/virtualMachines/start/action",
"Microsoft.Compute/virtualMachines/restart/action",
"Microsoft.Compute/virtualMachines/deallocate/action"
],
"NotActions": [
, "AssignableScopes": [ "/subscriptions/xxxx" ]
}

You can save with CTRL+S and exit the visual editor with CTRL+Q.

The role grants read permission and allow to start, restart, and stop the VM. Do not forget to add your subscription id at the end (line 16).

Create the role based off the template:

az role definition create –role-definition role.json

When assigning a role the custom role should also be listed. You can either assign this role to a Resource Group or the VM directly.

References:

https://stackoverflow.com/questions/23668154/allow-users-to-start-stop-particular-azure-vms

Reading time: 1 min
Citrix XenApp•Citrix Xendesktop

Citrix Workspace App: Multiple virtual desktops with split-screen

June 10, 2020 by AJNI No Comments

Have you ever wondered what this setting in Citrix Workspace App does?

Well, today I figured out: you can set multiple virtual desktops for your session in a split-screen fashion. Just like this:

The session must be in full-screen mode. Here is how it looks:

Reading time: 1 min
Page 8 of 11« First...«78910»...Last »

Like what you are reading? Buy me a coffee.

Tip Of the Day

  • Add Alias to Windows Fileserver (Server 2019, 2022, 2025)

    1 month ago

Keep in touch

Oh hi there!
It’s nice to meet you.

Sign up to receive awesome content in your inbox, every month.

Check your inbox or spam folder to confirm your subscription.

Categories

  • AI & Deep Learning (1)
  • Azure (20)
  • Citrix XenApp (21)
  • Citrix Xendesktop (13)
  • Cloud Computing (40)
  • Coding (1)
  • Hyper-V (10)
  • Linux (8)
  • Microsoft 365 (26)
  • Powershell (21)
  • Security (7)
  • VDI (16)
  • Virtualization (21)
  • VMware (12)
  • Windows (21)
  • Windows Client OS (39)
  • Windows Server (92)

Archives

  • May 2025
  • April 2025
  • February 2025
  • January 2025
  • December 2024
  • November 2024
  • October 2024
  • September 2024
  • July 2024
  • June 2024
  • May 2024
  • April 2024
  • March 2024
  • February 2024
  • January 2024
  • December 2023
  • September 2023
  • August 2023
  • July 2023
  • June 2023
  • April 2023
  • March 2023
  • January 2023
  • December 2022
  • November 2022
  • October 2022
  • September 2022
  • August 2022
  • July 2022
  • June 2022
  • May 2022
  • February 2022
  • January 2022
  • December 2021
  • November 2021
  • October 2021
  • September 2021
  • August 2021
  • June 2021
  • May 2021
  • April 2021
  • March 2021
  • February 2021
  • December 2020
  • November 2020
  • September 2020
  • August 2020
  • July 2020
  • June 2020
  • May 2020
  • April 2020
  • March 2020
  • February 2020
  • November 2019
  • October 2019
  • September 2019
  • August 2019
  • July 2019
  • June 2019
  • May 2019
  • April 2019
  • March 2019

ajni IT © 2019