Home
Microsoft 365
Linux
Windows
Powershell
Cloud Computing
    Citrix Xendesktop
    Citrix XenApp
Useful links
About
  • Home
  • Microsoft 365
  • Linux
  • Windows
  • Powershell
  • Cloud Computing
    • Citrix Xendesktop
    • Citrix XenApp
  • Useful links
  • About
ajni.IT -
Citrix XenApp•Citrix Xendesktop•Cloud Computing•VDI•Windows Client OS•Windows Server

Publish Click Once Applications on Citrix Virtual Apps and/or Desktops

August 15, 2022 by AJNI No Comments

Just recently I learned that Microsoft ClickOnce Applications are a pain in the ass and cannot be published as Published Applications the usual way through Citrix Virtual Apps and Desktops.

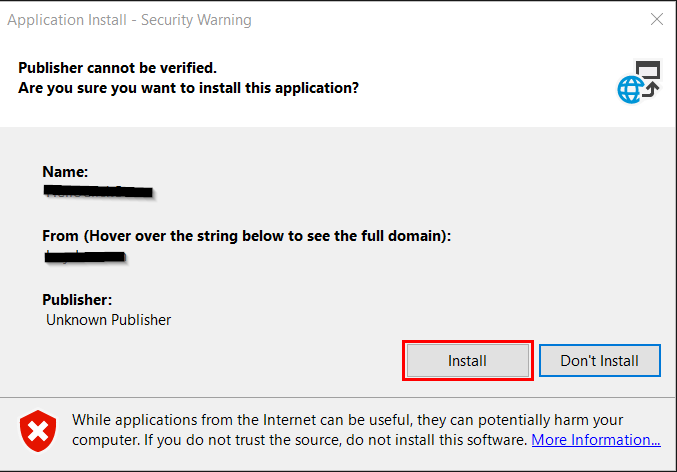
Usually the message below shows up before starting or installing the application (which is on a user basis – I absolutely hate that. Thanks for that Microsoft and Developers). If you try to publish the file ending with .application nothing will happen.

Creating a BAT file and publishing that bat file will show the prompt and the desired application will start:

cd /d “C:\Windows\Microsoft.NET\Framework\v4.0.30319”

start dfsvc.exe

start “C:\Program Files (x86)\Internet Explorer\iexplore.exe” “http://webserver/app”

This does also work:

start “C:\Program Files (x86)\Internet Explorer\iexplore.exe” “\\fileserver\share$\bestsoftware.application”

Kudos:

https://www.nomadit.xyz/clickonce-prompt-for-citrix-published-app/

Reading time: 1 min
Citrix XenApp•Citrix Xendesktop•Cloud Computing•VDI•Windows Server

Printer Redirection on Citrix Workspace for Mac OS not working

February 2, 2022 by AJNI No Comments

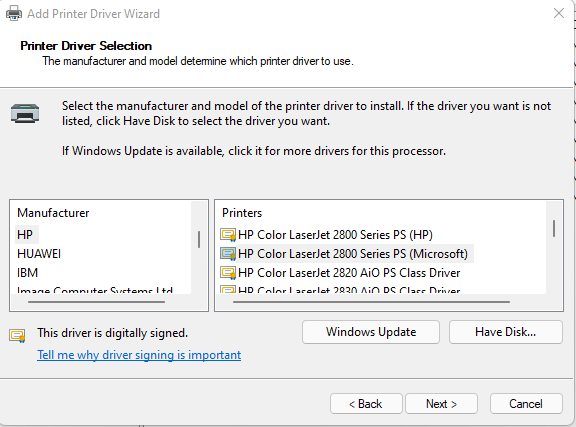
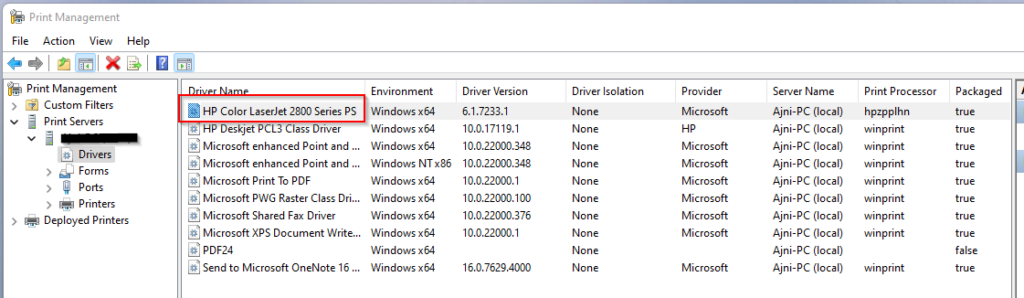
Having issues with print redirection on Citrix Workspace for Mac OS? Try installing the HP Color LaserJet 2800 Series PS print driver on your terminal server (Server 2019 and newer). It sounds dumb, but Citrix Universal Print Driver (UPD) uses Postscript data that is developed by HP. You can read more about this in the Citrix article at the end of the page.

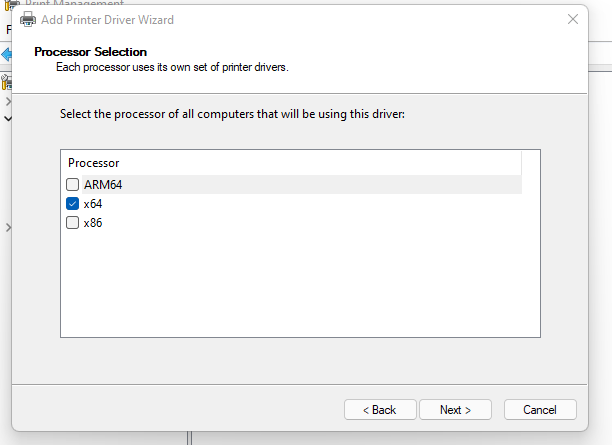
To install this print driver, open printmanagement.msc on your VDA. Open up Print servers > Servername > Drivers > Add Driver

Select x64

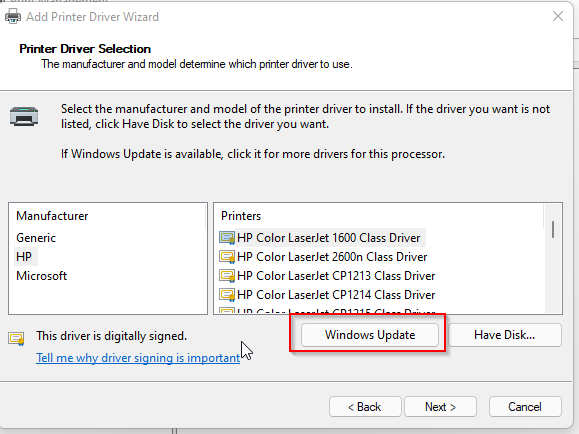
And then Windows Update to check for drivers through Windows Update service.

If you don’t find the driver, manually download it through Windows Update Catalog, extract it with Winzip or 7Zip and select Have Disk…

https://www.catalog.update.microsoft.com/Search.aspx?q=HP%20LaserJet%202800

References:

https://support.citrix.com/article/CTX140208

Reading time: 1 min
Citrix XenApp•Citrix Xendesktop•Powershell•VDI•Windows Server

Migrate Citrix Virtual Apps and Desktops database to new server

January 31, 2022 by AJNI No Comments

Migrating the Citrix Site database to a new database server is pretty straight forward but needs to be planned since there is a downtime when making the switch.

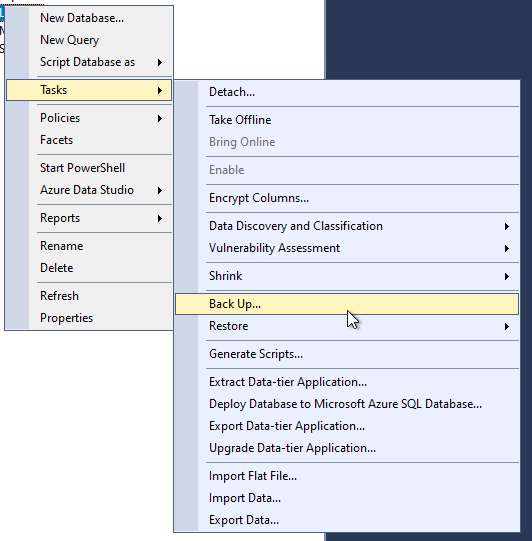
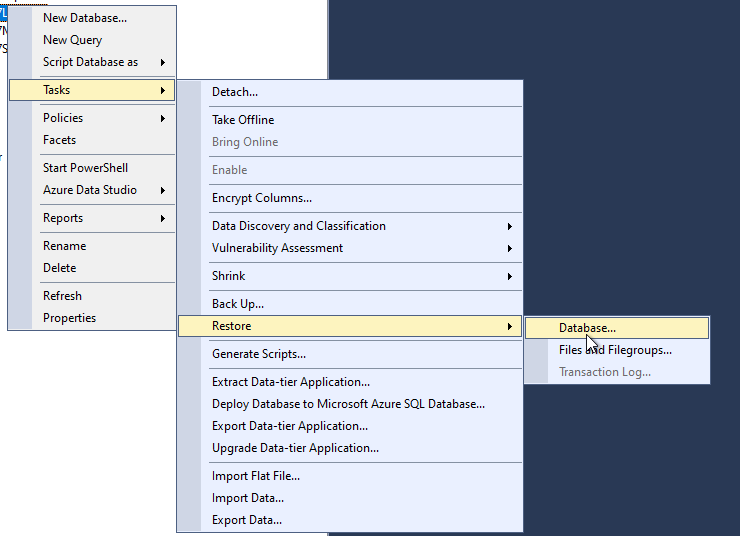
First of all, take a backup of the database with SQL Server Management Studio and restore the database on the new server:

Select the file that has just been backed up.

Run a new query with CTRL + N and add the DDC’s (Delivery Controller) computer account:

create login [domain\ctx1$] from windows

Make sure the computer account has proper roles under Security > Logins > domain\ctx1$ > right click > properties (the computer account needs to have all permission ending with _ROLE in all three databases).

Step 1 is to remove the old database connection string:

Add-PSSnapin Citrix*
Set-LogSite -State Disabled
Set-MonitorConfiguration -DataCollectionEnabled $false
Set-LogDBConnection -DataStore Logging -DBConnection $null
Set-MonitorDBConnection -DataStore Monitor -DBConnection $null
Set-MonitorDBConnection -DBConnection $null
Set-AcctDBConnection -DBConnection $null
Set-AnalyticsDBConnection -DBConnection $null
Set-AppLibDBConnection -DBConnection $null
Set-ProvDBConnection -DBConnection $null
Set-BrokerDBConnection -DBConnection $null
Set-EnvTestDBConnection -DBConnection $null
Set-SfDBConnection -DBConnection $null
Set-HypDBConnection -DBConnection $null
Set-OrchDBConnection -DBConnection $null
Set-TrustDBConnection -DBConnection $null
Set-ConfigDBConnection -DBConnection $null -force
Set-LogDBConnection -DBConnection $null -force
Set-AdminDBConnection -DBConnection $null -force

Step 2 is to check whether you are able to connect to the new database server. If that does not work, the SQL Server Ports (UDP 1434 for SQL Server Browser and a high port for the SQL server instance) need to be enabled in Windows Firewall. You might also need to enable TCP/IP in SQL Server configuration manager if you are using SQL Server Express.

$SQLServer = “ctxdb\sqlexpress”
$SiteDBName = “citrixsite”
$DBConnectSite = “Server=$SQLServer;Initial Catalog=$SiteDBName;Integrated Security=True”
Test-AdminDBConnection -DBConnection $DBConnectSite
Test-AcctDBConnection -DBConnection $DBConnectSite
Test-AnalyticsDBConnection -DBConnection $DBConnectSite
Test-AppLibDBConnection -DBConnection $DBConnectSite
Test-BrokerDBConnection -DBConnection $DBConnectSite
Test-ConfigDBConnection -DBConnection $DBConnectSite
Test-EnvTestDBConnection -DBConnection $DBConnectSite
Test-HypDBConnection -DBConnection $DBConnectSite
Test-LogDBConnection -DBConnection $DBConnectSite
Test-MonitorDBConnection -DBConnection $DBConnectSite
Test-OrchDBConnection -DBConnection $DBConnectSite
Test-TrustDBConnection -DBConnection $DBConnectSite
Test-ProvDBConnection -DBConnection $DBConnectSite
Test-SfDBConnection -DBConnection $DBConnectSite

Step 3 is to set the new database connection string

Add-PSSnapin Citrix*
$SQLServer = “ctxdb\sqlexpress”
$SiteDBName = “CitrixSite”
$LogDBName = “CitrixLogging”
$MonDBName = “CitrixMonitoring”
$DBConnectSite = “Server=$SQLServer;Initial Catalog=$SiteDBName;Integrated Security=True”
$DBConnectLog = “Server=$SQLServer;Initial Catalog=$LogDBName;Integrated Security=True”
$DBConnectMon = “Server=$SQLServer;Initial Catalog=$MonDBName;Integrated Security=True”
Set-AdminDBConnection -DBConnection $DBConnectSite
Set-ConfigDBConnection -DBConnection $DBConnectSite
Set-AcctDBConnection -DBConnection $DBConnectSite
Set-AnalyticsDBConnection -DBConnection $DBConnectSite
Set-AppLibDBConnection -DBConnection $DBConnectSite
Set-ProvDBConnection -DBConnection $DBConnectSite
Set-BrokerDBConnection -DBConnection $DBConnectSite
Set-EnvTestDBConnection -DBConnection $DBConnectSite
Set-OrchDBConnection -DBConnection $DBConnectSite
Set-TrustDBConnection -DBConnection $DBConnectSite
Set-SfDBConnection -DBConnection $DBConnectSite
Set-HypDBConnection -DBConnection $DBConnectSite
Set-LogDBConnection -DBConnection $DBConnectSite
Set-LogDBConnection -DataStore Logging -DBConnection $DBConnectLog
Set-MonitorDBConnection -DBConnection $DBConnectSite
Set-MonitorDBConnection -DataStore Monitor -DBConnection $DBConnectMon
Set-MonitorConfiguration -DataCollectionEnabled $true
Set-LogSite -State Enabled

In Step 4 Citrix services need to be stopped and started (Do NOT use Restart-Service!)

Get-Service Citrix* | Stop-Service -Force
Get-Service Citrix* | Start-Service

Step 5: Check if are connections are OK

Get-AcctServiceStatus
Get-AdminServiceStatus
Get-AnalyticsServiceStatus
Get-AppLibServiceStatus
Get-BrokerServiceStatus
Get-ConfigServiceStatus
Get-EnvTestServiceStatus
Get-HypServiceStatus
Get-LogServiceStatus
Get-MonitorServiceStatus
Get-OrchServiceStatus
Get-TrustServiceStatus
Get-ProvServiceStatus
Get-SfServiceStatus

Optionally, you can check if the new connection string is configured for every service that needs the database.

Get-MonitorDBConnection
Get-AcctDBConnection
Get-AnalyticsDBConnection
Get-AppLibDBConnection
Get-ProvDBConnection
Get-BrokerDBConnection
Get-EnvTestDBConnection
Get-SfDBConnection
Get-HypDBConnection
Get-OrchDBConnection
Get-TrustDBConnection
Get-ConfigDBConnection
Get-LogDBConnection
Get-AdminDBConnection

References:

https://support.citrix.com/article/CTX280675

Reading time: 2 min
Citrix XenApp•Citrix Xendesktop•VDI•Windows Server

How to release Citrix Virtual Apps and Desktops Licenses

May 3, 2021 by AJNI No Comments

When using User/Device licensing in Citrix, licenses are occupied for up to 90 days, which is a long time if you have a limited amount of licenses. If you need to release them, here is how you can do it:

  • Stop the service Citrix Licensing Service, Citrix License Config Service and Citrix Support Service
  • Delete the following folder (or rename it, just to be sure): “C:\Program Files(x86)\Citrix\Licensing\LS\resource\cache”
  • Start the service Citrix Licensing Service, Citrix License Config Service and Citrix Support Service
  • Enjoy

References:

https://ulrikchristensen.com/how-to-release-unused-citrix-user-or-device-licenses/

Reading time: 1 min
Azure•Citrix XenApp•Citrix Xendesktop•Cloud Computing•Powershell

How to use a custom Azure VM type on Citrix MCS (On-Prem and Citrix Cloud)

July 27, 2020 by AJNI No Comments

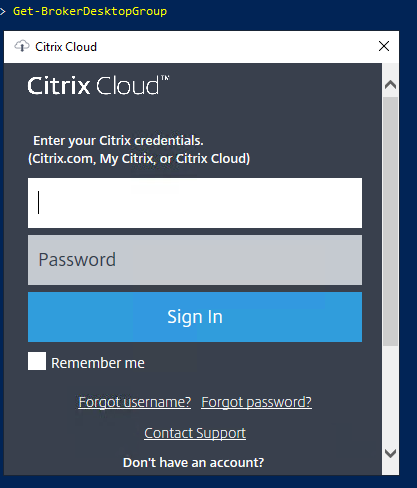
If you are using Citrix MCS with Azure VMs, you might have noticed that not all the VM SKUs are available to select when creating a new Machine Catalog. With PowerShell, though, you can use any Azure VM SKUs.

If you are using Citrix Cloud, you have to download and install the Citrix Powershell SDK and login with your Citrix credentials. Optionally you could download an API client and authenticate with those credentials.

The secure client can be downloaded under Identity and Access Management > API Access > Create client. The customer id will also be shown on that page.

You authenticate with the API client this way:

Set-XDCredentials -CustomerId “customername” -SecureClientFile “C:\temp\secureclient.csv” -ProfileType CloudAPI

Otherwise, without API credentials, after executing the first command, you will be asked to insert your Citrix credentials:

Now the commands to change the Citrix MCS VM type.

Get-ProvScheme -ProvisioningSchemeName “CatalogName”

Take note of the folder name after XDHYP:\HostingUnits\ under MasterImageVM.

This command will register the virtual drive XDHYP:\ in PowerShell:

Set-HypAdminConnection

Insert that folder name in this command:

Set-ProvScheme –ProvisioningSchemeName “CatalogName” –ServiceOffering “XDHyp:\HostingUnits\Foldername\serviceoffering.folder\Standard_NV4as_v4.serviceoffering”

Delete and re-create the VM. The right VM type will be then used.

Reading time: 1 min
Page 2 of 3«123»

Like what you are reading? Buy me a coffee.

Tip Of the Day

  • Add Alias to Windows Fileserver (Server 2019, 2022, 2025)

    1 month ago

Keep in touch

Oh hi there!
It’s nice to meet you.

Sign up to receive awesome content in your inbox, every month.

Check your inbox or spam folder to confirm your subscription.

Categories

  • AI & Deep Learning (1)
  • Azure (20)
  • Citrix XenApp (21)
  • Citrix Xendesktop (13)
  • Cloud Computing (40)
  • Coding (1)
  • Hyper-V (10)
  • Linux (8)
  • Microsoft 365 (26)
  • Powershell (21)
  • Security (7)
  • VDI (16)
  • Virtualization (21)
  • VMware (12)
  • Windows (21)
  • Windows Client OS (39)
  • Windows Server (92)

Archives

  • May 2025
  • April 2025
  • February 2025
  • January 2025
  • December 2024
  • November 2024
  • October 2024
  • September 2024
  • July 2024
  • June 2024
  • May 2024
  • April 2024
  • March 2024
  • February 2024
  • January 2024
  • December 2023
  • September 2023
  • August 2023
  • July 2023
  • June 2023
  • April 2023
  • March 2023
  • January 2023
  • December 2022
  • November 2022
  • October 2022
  • September 2022
  • August 2022
  • July 2022
  • June 2022
  • May 2022
  • February 2022
  • January 2022
  • December 2021
  • November 2021
  • October 2021
  • September 2021
  • August 2021
  • June 2021
  • May 2021
  • April 2021
  • March 2021
  • February 2021
  • December 2020
  • November 2020
  • September 2020
  • August 2020
  • July 2020
  • June 2020
  • May 2020
  • April 2020
  • March 2020
  • February 2020
  • November 2019
  • October 2019
  • September 2019
  • August 2019
  • July 2019
  • June 2019
  • May 2019
  • April 2019
  • March 2019

ajni IT © 2019