Home
Microsoft 365
Linux
Windows
Powershell
Cloud Computing
    Citrix Xendesktop
    Citrix XenApp
Useful links
About
  • Home
  • Microsoft 365
  • Linux
  • Windows
  • Powershell
  • Cloud Computing
    • Citrix Xendesktop
    • Citrix XenApp
  • Useful links
  • About
ajni.IT -
Azure•Cloud Computing•Microsoft 365•Windows Server

Configuring Azure AD Connect for user synchronization

May 22, 2021 by AJNI No Comments

The first step in the journey to the cloud is to install and configure Azure AD Connect. This will synchronize users in local Active Directory to Azure AD and will allow you to use cloud services like OneDrive For Business, Sharepoint Online, Exchange Online, or Microsoft Teams.

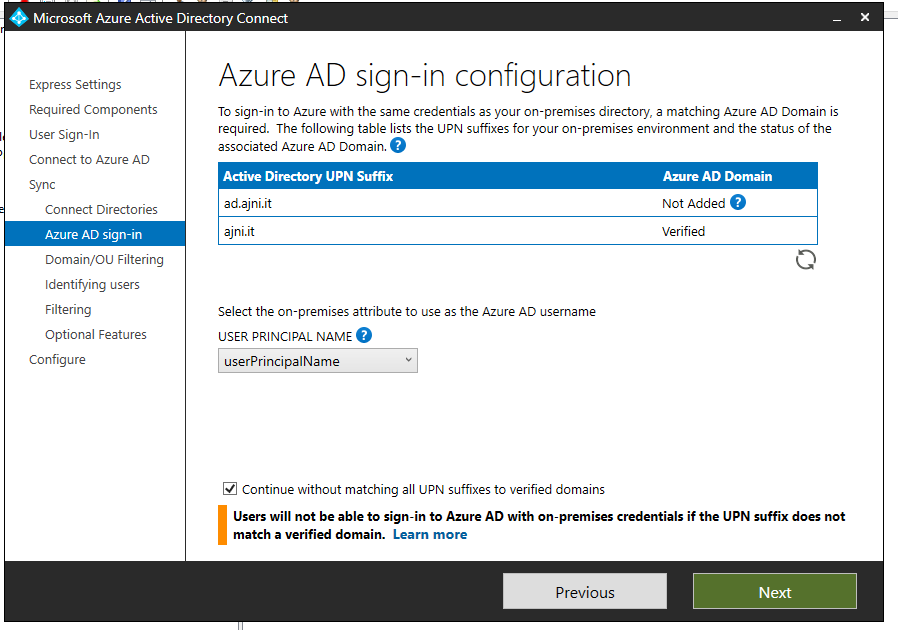
Before installing the service itself, we have to set an alternate UPN suffix as in Azure AD. In Active Directory Domains and Trusts add a new UPN suffix. The suffix should be equal to the custom domain name in Azure AD.

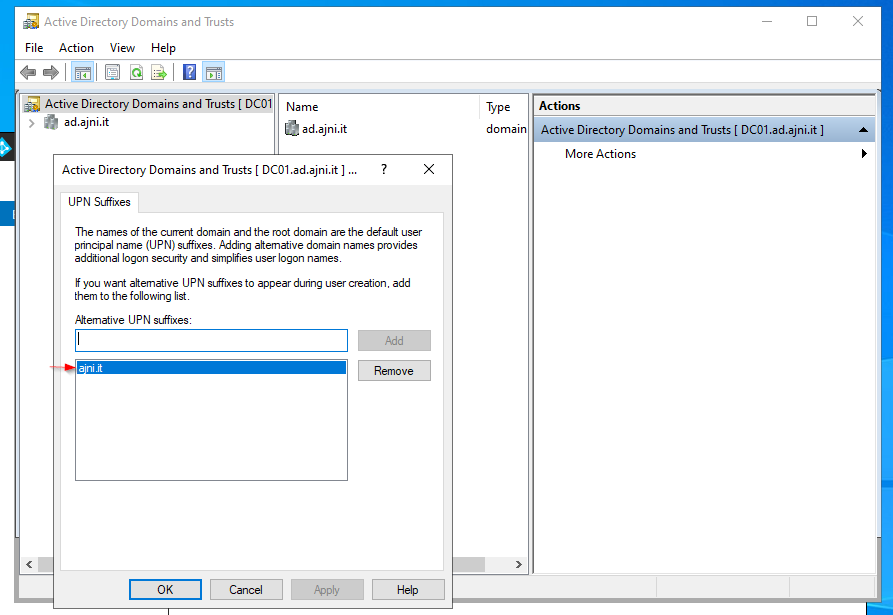
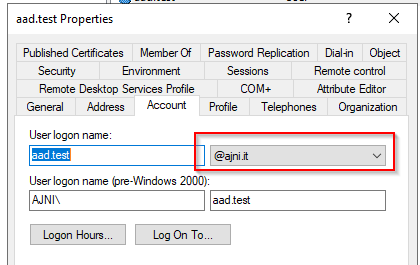
Users synchronizing to Azure AD should have that UPN suffix set:

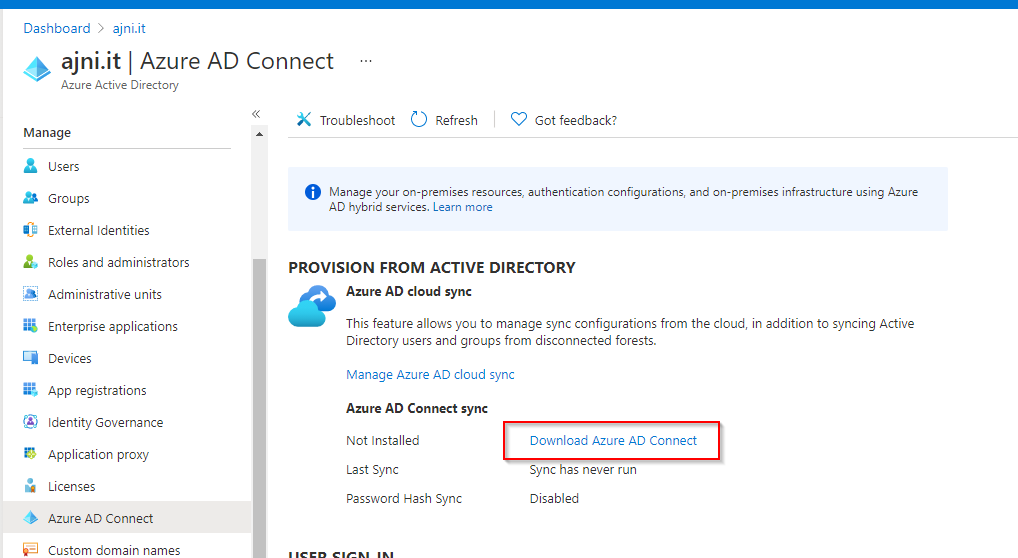
In the Azure AD panel, select Azure AD Connect and then “Download Azure AD Connect”

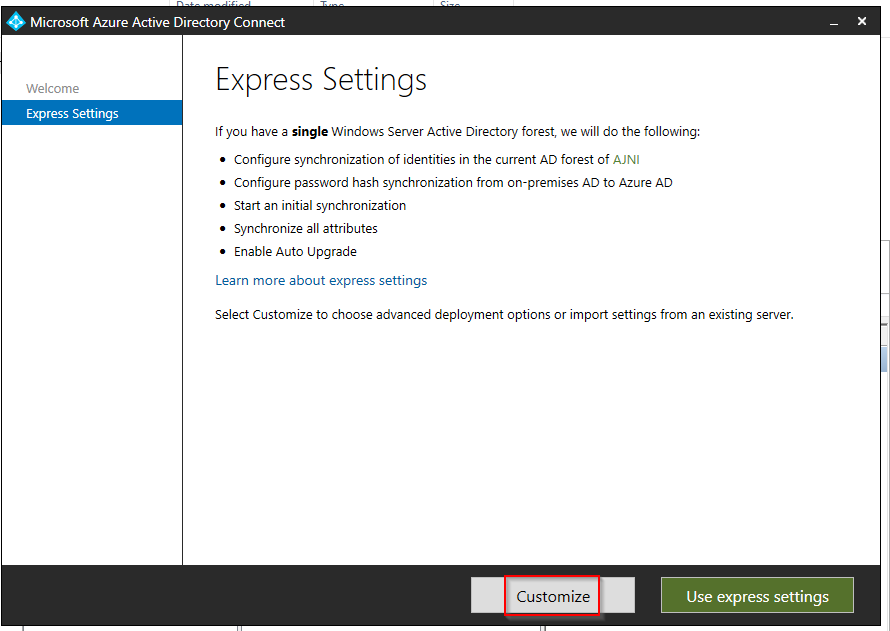
Start the installer and select “Customize”
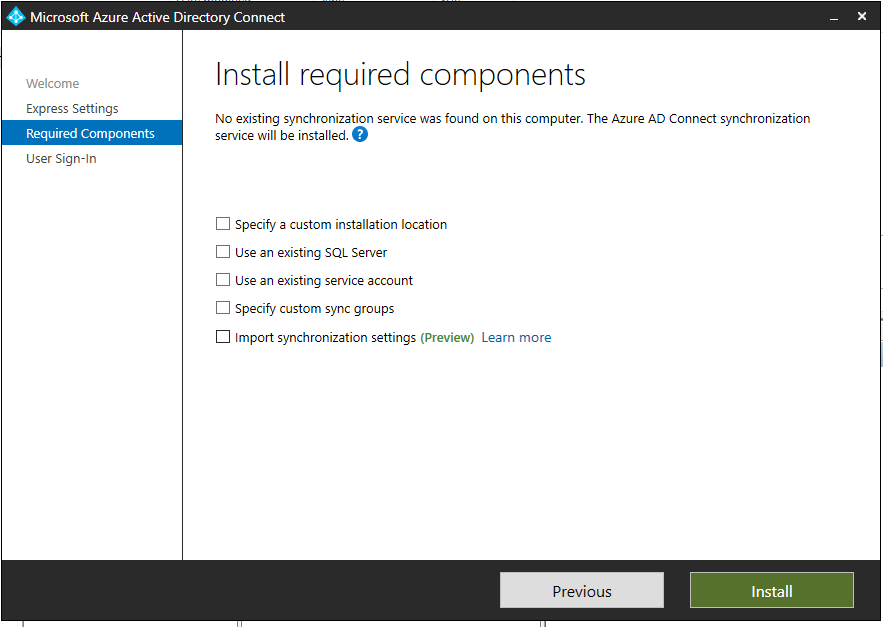
Hit install

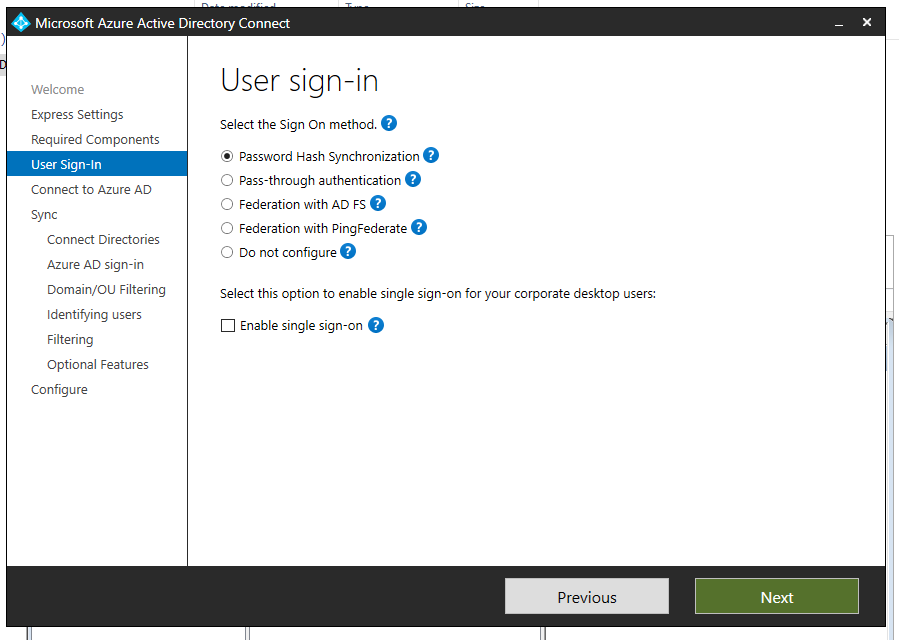
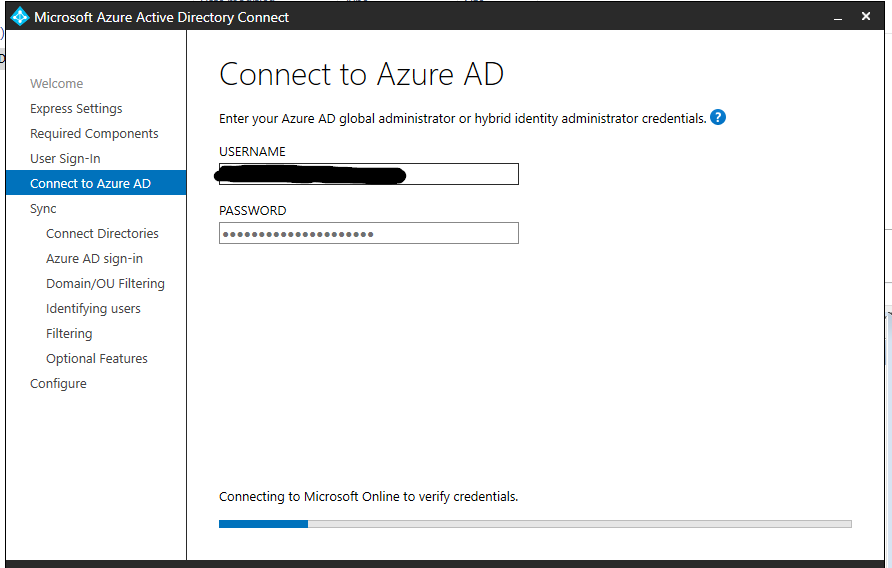
Select Password Hash Synchronization and login with your Azure AD global admin

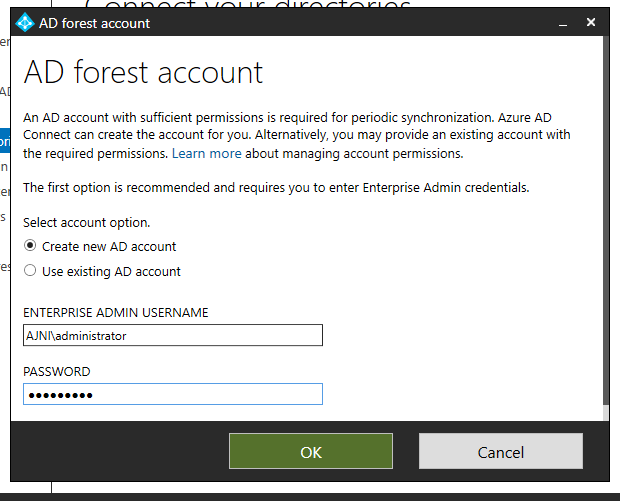
Select Create new AD Account and enter Enterprise Admin credentials. The tool will automatically set the correct permission on the OU without adding Domain Admin rights to the user.

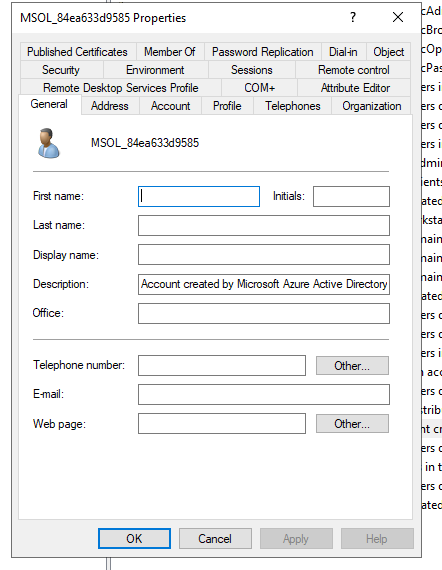
You will notice that a new user named MSOL_xxx has been created.

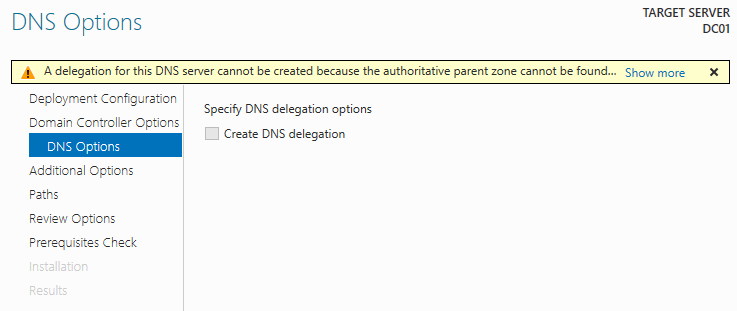
This is just a warning. We already set the correct UPN suffix.

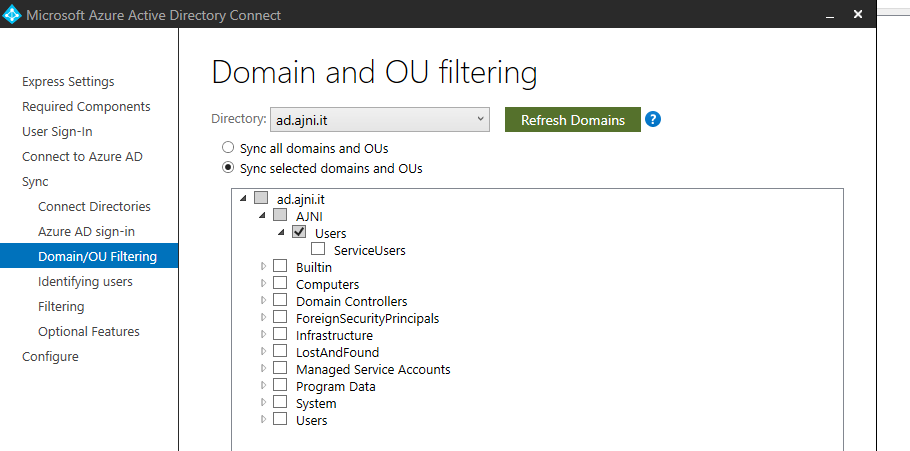
Deselect the top checkbox and select the OU containing AD Users. Service users should not be synchronized.

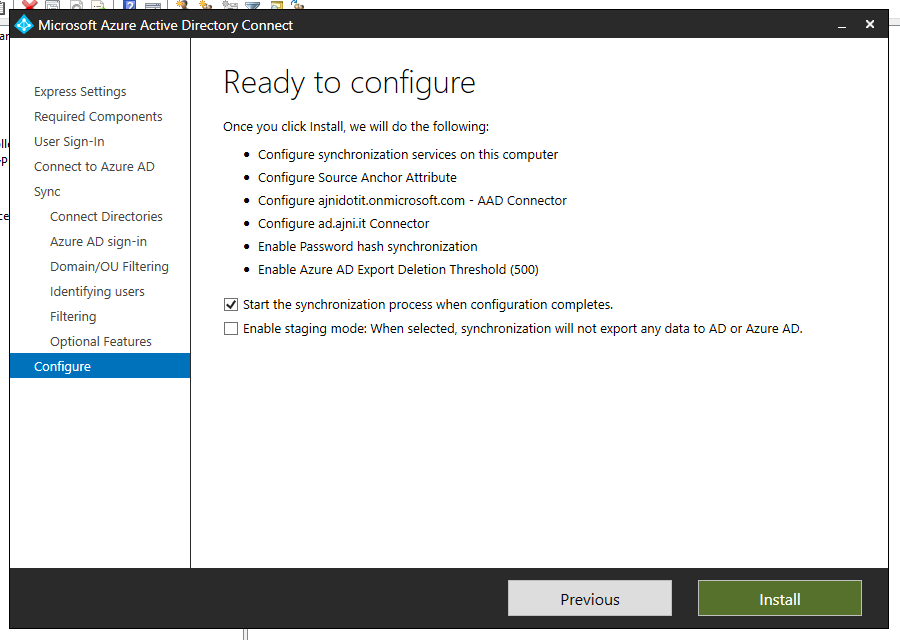
Leave everything else on default settings and then hit install.

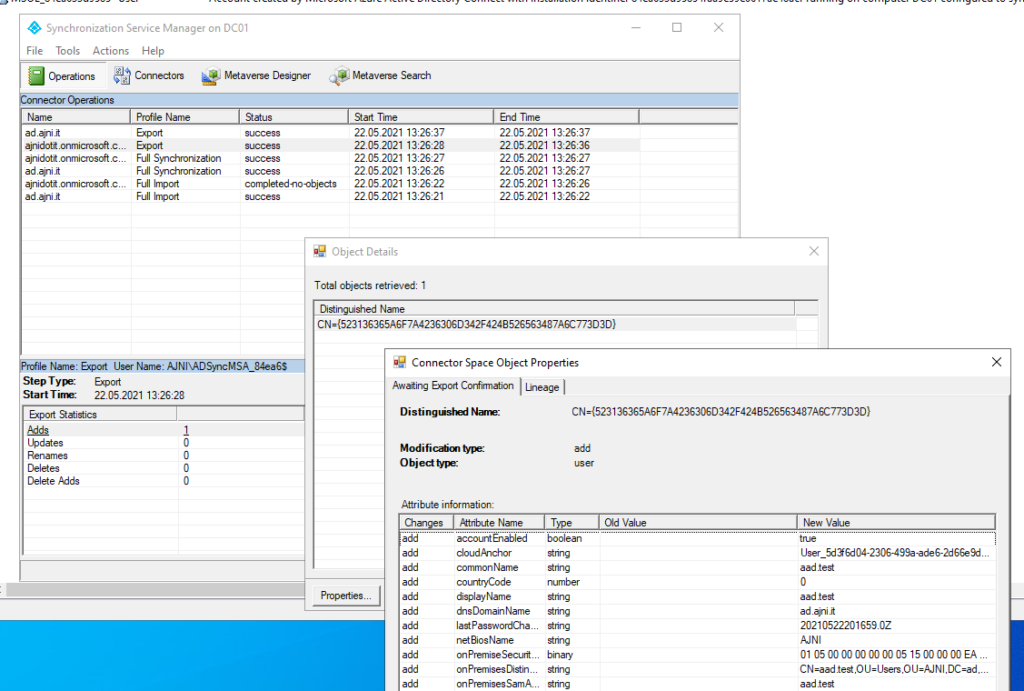
With the synchronization service you can check what objects have been synced and the last time a sync ran.

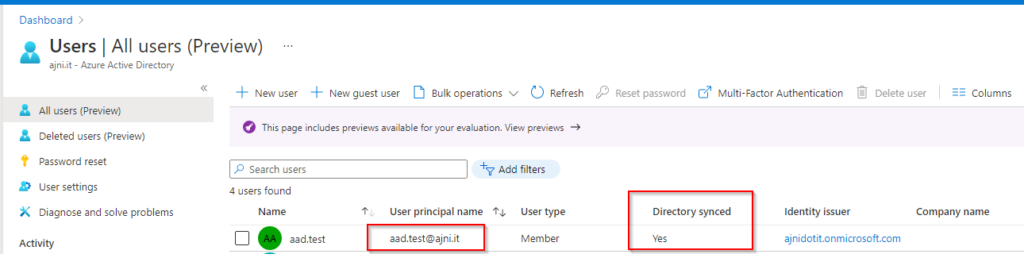
In Azure AD the synced user should show up. You can see that the correct UPN has been configured on the user.

If you want to manually start AD Sync, in Windows PowerShell enter this command:

Start-ADSyncSyncCycle -PolicyType Delta

Reading time: 1 min
Azure•Microsoft 365

Hide Microsoft 365 Users from GAL when synchronized with Azure AD Connect

May 10, 2021 by AJNI No Comments

When synchronizing on-prem users to Azure AD, there is a chance that Exchange attributes like msexchHideFromAddressLists are missing in Active Directory because the Exchange schema has never been updated, since there has never been a local installation of Microsoft Exchange. In that case, you could either extend the AD schema to include Exchange attributes or you could work with Azure AD synchronization rules, which is safer in my opinion.

On the Azure AD server, open Synchronization Rules Editor

Edit the rule “in from AD – User join”. This will disable the rule itself and create a new one. Give the rule a descriptive name and a precedence of 50.

Under Transformations, add a new rule:

Expression msexchHideFromAddressLists IIF(IsPresent([msExchAssistantName]),IIF([msExchAssistantName]=”HideFromGAL”,True,False),NULL) Update

Now, you can set the attribute msExchAssistantName to HideFromGAL on the AD user. This will tell Azure AD Connect to set msexchHideFromAddressLists to true on the cloud side.

Obviously, you could use another attribute to achieve the same goal. Just change the if statement slightly.

IIF(IsPresent([msExchAssistantName]),IIF([msExchAssistantName]=”HideFromGAL”,True,False),NULL)

References:

https://jackstromberg.com/2018/08/how-to-hide-users-from-the-gal-in-office-365-synchronized-from-on-premises/

Reading time: 1 min
Windows Server

Migrate Sysvol from FRS to DFSR

March 31, 2021 by AJNI No Comments

On old Windows Active Directory environments, you might need to upgrade the Sysvol share from File Replication Service to Distributed File System Replication. This is very easy to do and it should be done asap in your environment.

Unfortunately I do not have screenshots to share with you, but here are the steps:

With dfsrmig /getmigrationstate you can see the status of the migration. Dfsrmig has 4 states starting from 0:

  • State 0 – started
  • State 1 – prepared
  • State 2 – redirected
  • State 3 – eliminated

Step 1:

dfsrmig /setglobalstate 0

Wait untill all Domain Controllers have the state “started”. You can check the state with dfsrmig /getmigrationstate. Be very patient as it might take some time to replicate changes particularly if you have Domain Controllers on remote offices.

Step 2:

dfsrmig /setglobalstate 1

Wait until all Domain Controller have the state “prepared”. You can check the state with dfsrmig /getmigrationstate. Once again, be very patient and double check the output.

Step 3:

dfsrmig /setglobalstate 2

Wait until all Domain Controller have the state “redirected”. You can check the state with dfsrmig /getmigrationstate. Be very patient and double-check the output.

Step 3:

dfsrmig /setglobalstate 3

Wait until all Domain Controller have the state “eliminated”. You can check the state with dfsrmig /getmigrationstate. Be very patient and double-check the output.

In addition to the last migration state, make sure the File Replication Service service is disabled on every Domain Controller.

References:

https://www.rebeladmin.com/2015/04/step-by-step-guide-for-upgrading-sysvol-replication-to-dfsr-distributed-file-system-replication/

Reading time: 1 min
Hyper-V•Virtualization•Windows Server

Windows Server 2019: Installing the first Domain Controller in a new domain

October 22, 2019 by AJNI No Comments

So last time we created a Master-VHDX on Hyper-V with Windows Server 2019 in order to save space. Today we are installing the first Domain Controller with a fresh domain. Very straight forward stuff.

Before installing Active Directory Directory Services, the computer should have a decent name.

Give it a fixed IP address. Since this is going to be a lab, I am not going to plan the IP design. The Default Gateway does not exist yet. Also, the secondary DNS server will be installed later on a Server Core version.

From Server Manager Add Roles and Features, Select Role-based or feature-based installation

Select the Active Directory Directory Services Role

Everything else can be left on default.

Once the installation is completed, the server can be promoted to a Domain Controller.

Since there is no existing forest, the root domain name must be defined:

Define a new password for the Directory Services Restore Mode (DSRM). DSRM allows you to perform an authoritative restore of single or multiple AD objects through ntdsutil (from cmd).

This warning can be safely ignored.

The NetBIOS domain name can be used when logging into a domain computer, for example AJNI\Domainuser. The UserPrincipalName can be also used – domainuser@ajni.it.

The rest can be left to default.

The server will restart, after that the domain will be up and running!

The next blog post will be covering the installation of an additional Domain Controller (the second DNS server 10.10.10.11) with Windows Server 2019 Core Edition.

Stay tuned !

Reading time: 1 min

Like what you are reading? Buy me a coffee.

Tip Of the Day

  • Add Alias to Windows Fileserver (Server 2019, 2022, 2025)

    1 month ago

Keep in touch

Oh hi there!
It’s nice to meet you.

Sign up to receive awesome content in your inbox, every month.

Check your inbox or spam folder to confirm your subscription.

Categories

  • AI & Deep Learning (1)
  • Azure (20)
  • Citrix XenApp (21)
  • Citrix Xendesktop (13)
  • Cloud Computing (40)
  • Coding (1)
  • Hyper-V (10)
  • Linux (8)
  • Microsoft 365 (26)
  • Powershell (21)
  • Security (7)
  • VDI (16)
  • Virtualization (21)
  • VMware (12)
  • Windows (21)
  • Windows Client OS (39)
  • Windows Server (92)

Archives

  • May 2025
  • April 2025
  • February 2025
  • January 2025
  • December 2024
  • November 2024
  • October 2024
  • September 2024
  • July 2024
  • June 2024
  • May 2024
  • April 2024
  • March 2024
  • February 2024
  • January 2024
  • December 2023
  • September 2023
  • August 2023
  • July 2023
  • June 2023
  • April 2023
  • March 2023
  • January 2023
  • December 2022
  • November 2022
  • October 2022
  • September 2022
  • August 2022
  • July 2022
  • June 2022
  • May 2022
  • February 2022
  • January 2022
  • December 2021
  • November 2021
  • October 2021
  • September 2021
  • August 2021
  • June 2021
  • May 2021
  • April 2021
  • March 2021
  • February 2021
  • December 2020
  • November 2020
  • September 2020
  • August 2020
  • July 2020
  • June 2020
  • May 2020
  • April 2020
  • March 2020
  • February 2020
  • November 2019
  • October 2019
  • September 2019
  • August 2019
  • July 2019
  • June 2019
  • May 2019
  • April 2019
  • March 2019

ajni IT © 2019