Home
Microsoft 365
Linux
Windows
Powershell
Cloud Computing
    Citrix Xendesktop
    Citrix XenApp
Useful links
About
  • Home
  • Microsoft 365
  • Linux
  • Windows
  • Powershell
  • Cloud Computing
    • Citrix Xendesktop
    • Citrix XenApp
  • Useful links
  • About
ajni.IT -
Linux•Security

Set up Fail2Ban for SSH on Linux (Debian/Ubuntu)

June 16, 2020 by AJNI No Comments

The first step to securing your SSH configuration is to configure key-based authentication and not allow password authentication at all. That topic has already been discussed. Check out my post about that: https://www.ajni.it/2020/03/configure-ssh-key-based-authentication-on-a-linux-system/

The second step is to introduce an Intrusion Detection System (IDS or IPS). Fail2ban can achieve that specific goal. It analyses SSH authentication logs (it can be also set for other services) and blacklists IP addresses after n failed attempts with the help of iptables (firewall rules). Let’s check it out.

First of all make sure to update your system:

apt update

apt upgrade

Now install fail2ban:

apt install fail2ban

Start and enable the fail2ban service:

systemctl start fail2ban

systemctl enable fail2ban

Now a “jail” can be configured for failed ssh login attempts. There is a default /etc/fail2ban/jail.conf file, but we are going to create a new config jail.local.

nano /etc/fail2ban/jail.local

Paste following parameters in the file:

[sshd]
enabled = true
port = 22
filter = sshd
logpath = /var/log/auth.log
maxretry = 3
mode = aggressive
bantime = -1
findtime = 3600

Mode=aggressive includes failed attempts with public key authentication. Bantime = -1 is for persistent bans. Findtime indicates how far back logs are checked (now – 3600 minutes or 1 hour).

After saving the file, restart fail2ban:

service fail2ban restart

Blacklisted IPs can be viewed with

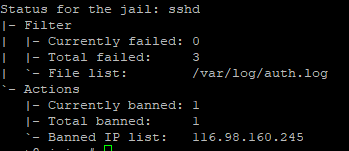
fail2ban-client status sshd

After some minutes one IP already showed up:

Or you can also view it with iptables.

iptables -L -n -v

Removing an IP from the blacklist is also easy (the command is self-explanatory)

fail2ban-client set sshd unbanip 10.10.10.1

Some other security considerations:

  • Don’t log in as root and do not allow user root over SSH
  • Use public-key authentication
  • Change the SSH port
  • Implement an IDS/IPS (fail2ban)

References:

https://www.techrepublic.com/article/how-to-install-fail2ban-on-ubuntu-server-18-04/

https://serverfault.com/questions/686422/modify-fail2ban-failregex-to-match-failed-public-key-authentications-via-ssh/686436

https://security.stackexchange.com/questions/188908/what-is-this-ssh-attack-am-i-hacked

https://www.liquidweb.com/kb/install-configure-fail2ban-ubuntu-server-16-04/

https://serverfault.com/questions/808866/get-fail2ban-to-check-findtime-every-x-minutes

Reading time: 1 min
Cloud Computing•Linux•Virtualization

Configure SSH Key-Based Authentication on a Linux System

March 10, 2020 by AJNI No Comments

By default, Linux systems allow both password-based and key-based authentication over SSH. If you have a server with SSH open to the world, password-based authentication shouldn’t be allowed at all.

To disable password-based authentication, edit the SSH config file:

nano /etc/ssh/sshd_config

Add the following lines:

PasswordAuthentication no

PubkeyAuthentication yes

Now generate a new private/public key pair:

ssh-keygen

id_rsa is your private key

id_rsa.pub is the public certificate thumbprint that must be added to ~/.ssh/authorized_keys

nano ~/.ssh/authorized_keys

The SSH service must be restarted.

service ssh restart

Now you can connect to your server with key-based authentication only. If connecting from a Linux system the file’s permissions must be set to 600.

chmod 600 id_rsa

ssh -i id_rsa ip@username

If you like using Putty, you’ll have to load the file with PuttyGen and save the private key as .ppk.

PuttyGen can be downloaded here: https://www.chiark.greenend.org.uk/~sgtatham/putty/latest.html

Links:

https://askubuntu.com/questions/346857/how-do-i-force-ssh-to-only-allow-users-with-a-key-to-log-in

Reading time: 1 min

Like what you are reading? Buy me a coffee.

Tip Of the Day

  • Add Alias to Windows Fileserver (Server 2019, 2022, 2025)

    5 days ago

Keep in touch

Oh hi there!
It’s nice to meet you.

Sign up to receive awesome content in your inbox, every month.

Check your inbox or spam folder to confirm your subscription.

Categories

  • AI & Deep Learning (1)
  • Azure (20)
  • Citrix XenApp (21)
  • Citrix Xendesktop (13)
  • Cloud Computing (40)
  • Coding (1)
  • Hyper-V (10)
  • Linux (8)
  • Microsoft 365 (26)
  • Powershell (21)
  • Security (7)
  • VDI (16)
  • Virtualization (21)
  • VMware (12)
  • Windows (21)
  • Windows Client OS (39)
  • Windows Server (92)

Archives

  • May 2025
  • April 2025
  • February 2025
  • January 2025
  • December 2024
  • November 2024
  • October 2024
  • September 2024
  • July 2024
  • June 2024
  • May 2024
  • April 2024
  • March 2024
  • February 2024
  • January 2024
  • December 2023
  • September 2023
  • August 2023
  • July 2023
  • June 2023
  • April 2023
  • March 2023
  • January 2023
  • December 2022
  • November 2022
  • October 2022
  • September 2022
  • August 2022
  • July 2022
  • June 2022
  • May 2022
  • February 2022
  • January 2022
  • December 2021
  • November 2021
  • October 2021
  • September 2021
  • August 2021
  • June 2021
  • May 2021
  • April 2021
  • March 2021
  • February 2021
  • December 2020
  • November 2020
  • September 2020
  • August 2020
  • July 2020
  • June 2020
  • May 2020
  • April 2020
  • March 2020
  • February 2020
  • November 2019
  • October 2019
  • September 2019
  • August 2019
  • July 2019
  • June 2019
  • May 2019
  • April 2019
  • March 2019

ajni IT © 2019