Home
Microsoft 365
Linux
Windows
Powershell
Cloud Computing
    Citrix Xendesktop
    Citrix XenApp
Useful links
About
  • Home
  • Microsoft 365
  • Linux
  • Windows
  • Powershell
  • Cloud Computing
    • Citrix Xendesktop
    • Citrix XenApp
  • Useful links
  • About
ajni.IT -
Windows•Windows Client OS

Enabling Bitlocker Drive Encryption without a TPM chip

March 7, 2020 by AJNI No Comments

I was trying to enable Bitlocker on my C: drive, but unfortunately my PC does not have a physical TPM chip built-in. Turns out there is a way to enable Bitlocker Drive Encryption without the TPM chip with help of Group Policies.

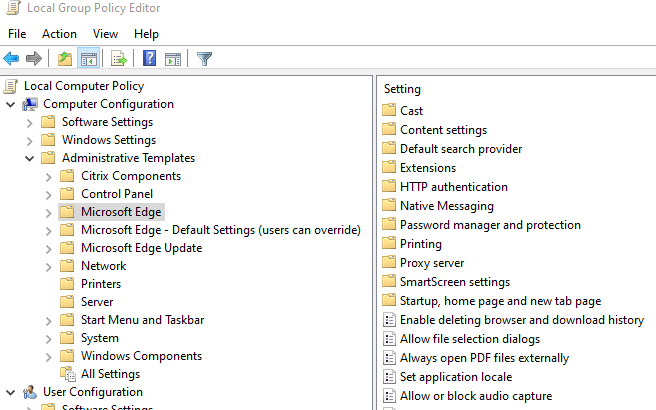
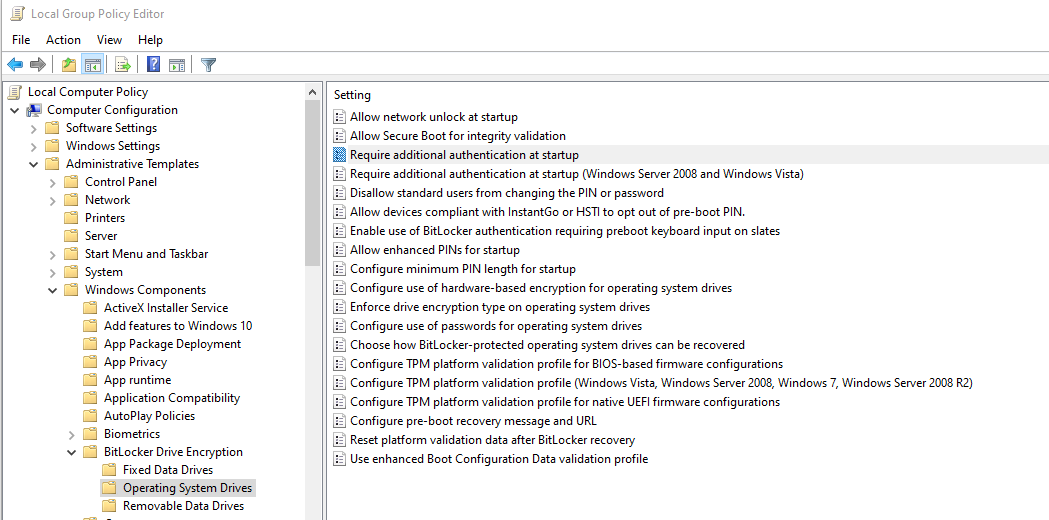
Open Local Group Policies (gpedit.msc) > Administrative Templates > Windows Components > Bitlocker Drive Encryption > Operating System Drives > Require additional authentication at starutp

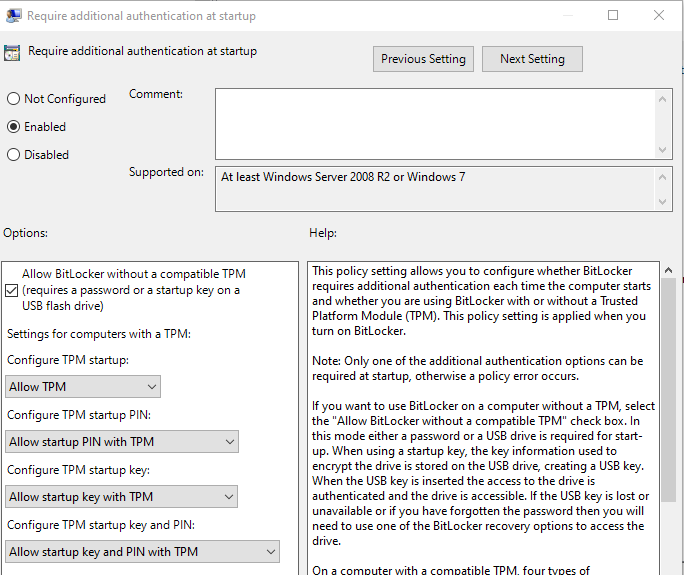
Enable this Policy and leave the default settings.

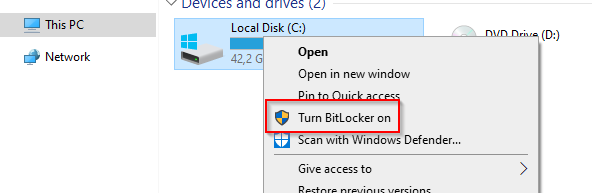
Now in Windows Explorer, Bitlocker can be turned on:

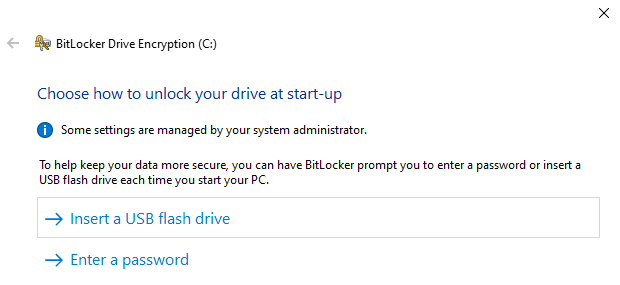
Because there is no TPM chip available, we either have the option to enter a password every time the OS boots or unlock the drive with a USB flash drive.

There are a few options for saving the recovery key. If you save it to your Microsoft Account, it can be accessed on this Microsoft site: https://account.microsoft.com/devices/recoverykey

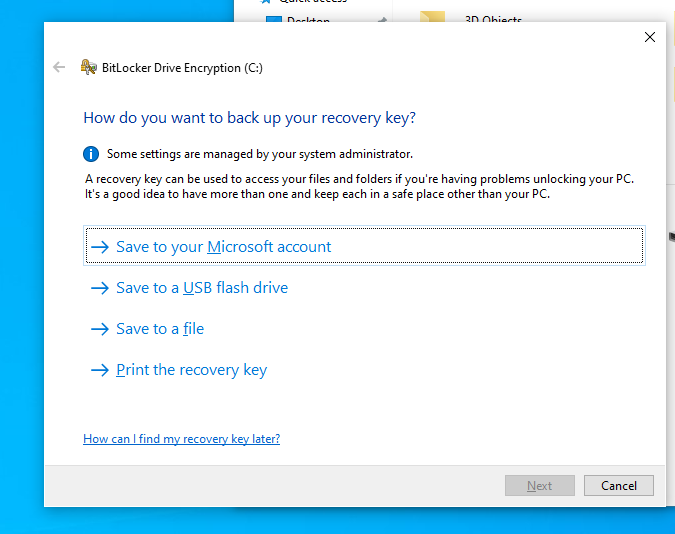
Select the first option if you just re-installed Windows.

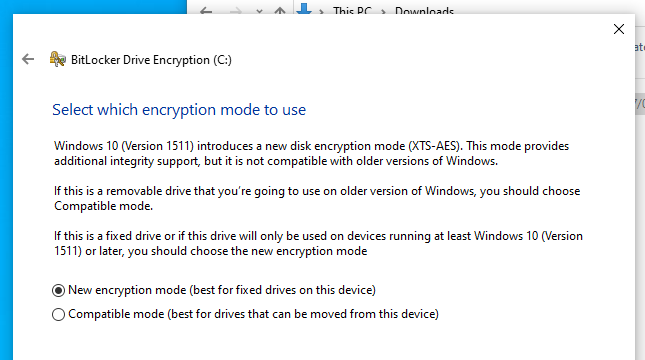
New should be better right?

Your PC will be restarted.

At boot, this is the prompt you’ll get:

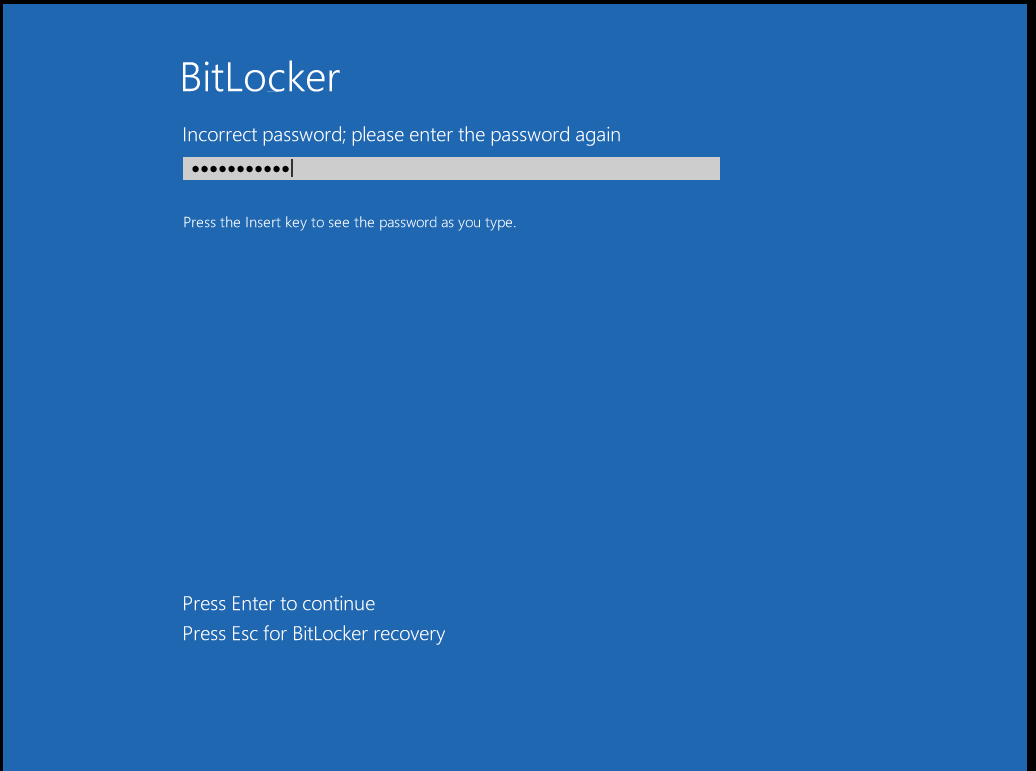
Don’t forget to secure your Bitlocker Recovery Key just in case something breaks. You’ll need that long string.

Links:

https://support.microsoft.com/en-us/help/4530477/windows-10-finding-your-bitlocker-recovery-key

https://www.howtogeek.com/192894/how-to-set-up-bitlocker-encryption-on-windows/

Reading time: 1 min
Citrix XenApp•Citrix Xendesktop•Cloud Computing•Powershell•VDI•Windows Client OS•Windows Server

Quick tip: Set Windows language with five Powershell commands

February 17, 2020 by AJNI No Comments

A quick post on how to change the Windows display language with Powershell. You might use these commands based on any logic that determines the user’s location/language. For instance, I created a script that gets executed on logon and sets the language based on some criteria (maybe an Active-Directory group or attribute).

Set-Culture en-US
Set-WinSystemLocale -SystemLocale en-US
Set-WinUILanguageOverride -Language en-US
Set-WinUserLanguageList en-US -Force
Set-WinHomeLocation -GeoId 244

You can find the right GeoID on Microsoft’s website

Reading time: 1 min
Windows•Windows Client OS•Windows Server

Use Steps Recorder to document procedures in an automated way

November 7, 2019 by AJNI No Comments

There is a built-in app in Windows that helps you record your screen and automatically creates steps with screenshots and a description. Just search “Steps Recorder” in the start menu.

Running the program as administrator allows you to record programs that run with highest privileges. Just start recording, go through the steps needed for the specific action, stop the recording and finally save the steps.

A compressed file will be created containing the report as a MHT file. It can be opened with a common browser.

A very handy tool both for documentations or end users.

Enjoy!

Reading time: 1 min
Citrix XenApp•Cloud Computing•Virtualization•Windows Client OS•Windows Server

Group Policies and IE Mode in Microsoft Edge Chromium

August 31, 2019 by AJNI 2 Comments

MS Edge Beta has been out for some days now and the Group Policy Templates are already available for download, which are crucial for IT Pros.

You can download them here.

How to import them in the GP Editor? Easy. You can test them on your local machine first. Just copy the files msedge.admx and msedgeupdate.admx to C:\windows\PolicyDefinitions and the language .adml files to C:\windows\PolicyDefinitions\en-US.

In an Enterprise environment you normally move these files into the central group policy store, located under \\domain.com\SYSVOL\domain.com\policies\PolicyDefinitions.

After opening Group Policy Editor (gpedit.msc), under Computer Configuration > Administrative Templates you will see the newly imported Policies:

Now let’s specifically configure the IE Mode feature. For that we need to configure two settings. The first will configure the IE Mode and the second one lists the websites that are affected by IE Mode.

Under Microsoft Edge > Configure Internet Explorer Integration you want to select Internet Explorer Mode in order to integrate IE with the new Edge in case one of the specificied URLs is visited:

The second one is located under Windows Components > Internet Explorer > Use the Enterprise Mode IE Website List. You can use a file:///C:/local/path.xml, a \\network\path or a https://URL that hosts the XML file. I will be using a local path here.

With the MS Tool Enterprise Mode Site List Manager you can easily add or edit the site list. Just add a new URL, select the IE Mode you want to use and save it as an XML.

Now do a gpupdate /force, restart Edge and test your site. You will know that the policy has applied if you see the IE icon when you visit a site you have specified in the Enterprise Mode Site List Manager.

If you are having issues getting this to work, make sure your device has the latest Windows Updates installed, like stated in the Microsoft documentation.

Also this feature is not yet supported on Windows Server 2016 and some older versions of Windows 10.

If you have problems with MS Edge on Windows Server 2016 RDS with Citrix XenApp, you will have to exclude the process msedge.exe from Citrix hooks:

HKEY_LOCAL_MACHINE\SOFTWARE\Citrix\CtxHook
REG_SZ “ExcludedImageNames”
Value “msedge.exe”

Reading time: 1 min
Citrix XenApp•Citrix Xendesktop•Cloud Computing•Virtualization•Windows•Windows Client OS•Windows Server

Quick Tip: How to properly delete local Windows User Profiles

July 1, 2019 by AJNI No Comments

Are you trying to delete a local Windows User Profile because something doesn’t behave the way it should? Here is a quick and easy tip to remember.

Deleting a user profile is very straightforward, if you know how to. Just deleting C:\Users\<username> is not enough though. In fact stranger things might occur if you just delete the user’s folder.

There are two ways of deleting a user profile:

Method 1: Advanced System Settings (Very easy)

By going into the Advanced System Settings you can delete a user profile. The user obviously has to be logged off, otherwise the “Delete” button will be greyed out.

Method 2: Regedit

Note: It is always a good idea to make a backup of your current Registry entries BEFORE making any changes. You could for example rename the registry key or “Export” it by right clicking on the key you want to backup. Sub-keys are also backed up.

There are cases where the user profile is not listed in the Advanced System Settings, but the user folder is present under C:\Users. In that case you can firstly delete the profile SID under

HKEY_LOCAL_MACHINE\SOFTWARE\Microsoft\Windows NT\CurrentVersion\ProfileList\

You do not have to know the user’s SID, the Key “ProfileImagePath” will help you determine the username associated with the SID.

After deleting the whole key (left side), you can also delete the user’s folder under C:\Users.

Reading time: 1 min
Page 4 of 5« First...«2345»

Like what you are reading? Buy me a coffee.

Tip Of the Day

  • Why investing in ETFs is important

    3 weeks ago

Keep in touch

Oh hi there!
It’s nice to meet you.

Sign up to receive awesome content in your inbox, every month.

Check your inbox or spam folder to confirm your subscription.

Categories

  • AI & Deep Learning (1)
  • Azure (20)
  • Citrix XenApp (21)
  • Citrix Xendesktop (13)
  • Cloud Computing (40)
  • Coding (1)
  • Hyper-V (10)
  • Investing (1)
  • Linux (8)
  • Microsoft 365 (27)
  • Powershell (22)
  • Security (7)
  • VDI (16)
  • Virtualization (21)
  • VMware (12)
  • Windows (21)
  • Windows Client OS (42)
  • Windows Server (96)

Archives

  • January 2026
  • December 2025
  • August 2025
  • May 2025
  • April 2025
  • February 2025
  • January 2025
  • December 2024
  • November 2024
  • October 2024
  • September 2024
  • July 2024
  • June 2024
  • May 2024
  • April 2024
  • March 2024
  • February 2024
  • January 2024
  • December 2023
  • September 2023
  • August 2023
  • July 2023
  • June 2023
  • April 2023
  • March 2023
  • January 2023
  • December 2022
  • November 2022
  • October 2022
  • September 2022
  • August 2022
  • July 2022
  • June 2022
  • May 2022
  • February 2022
  • January 2022
  • December 2021
  • November 2021
  • October 2021
  • September 2021
  • August 2021
  • June 2021
  • May 2021
  • April 2021
  • March 2021
  • February 2021
  • December 2020
  • November 2020
  • September 2020
  • August 2020
  • July 2020
  • June 2020
  • May 2020
  • April 2020
  • March 2020
  • February 2020
  • November 2019
  • October 2019
  • September 2019
  • August 2019
  • July 2019
  • June 2019
  • May 2019
  • April 2019
  • March 2019

ajni IT © 2019